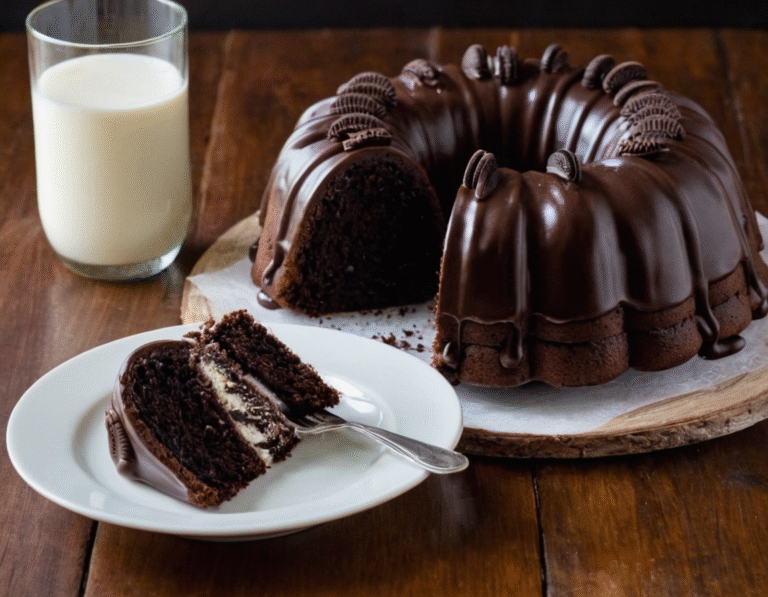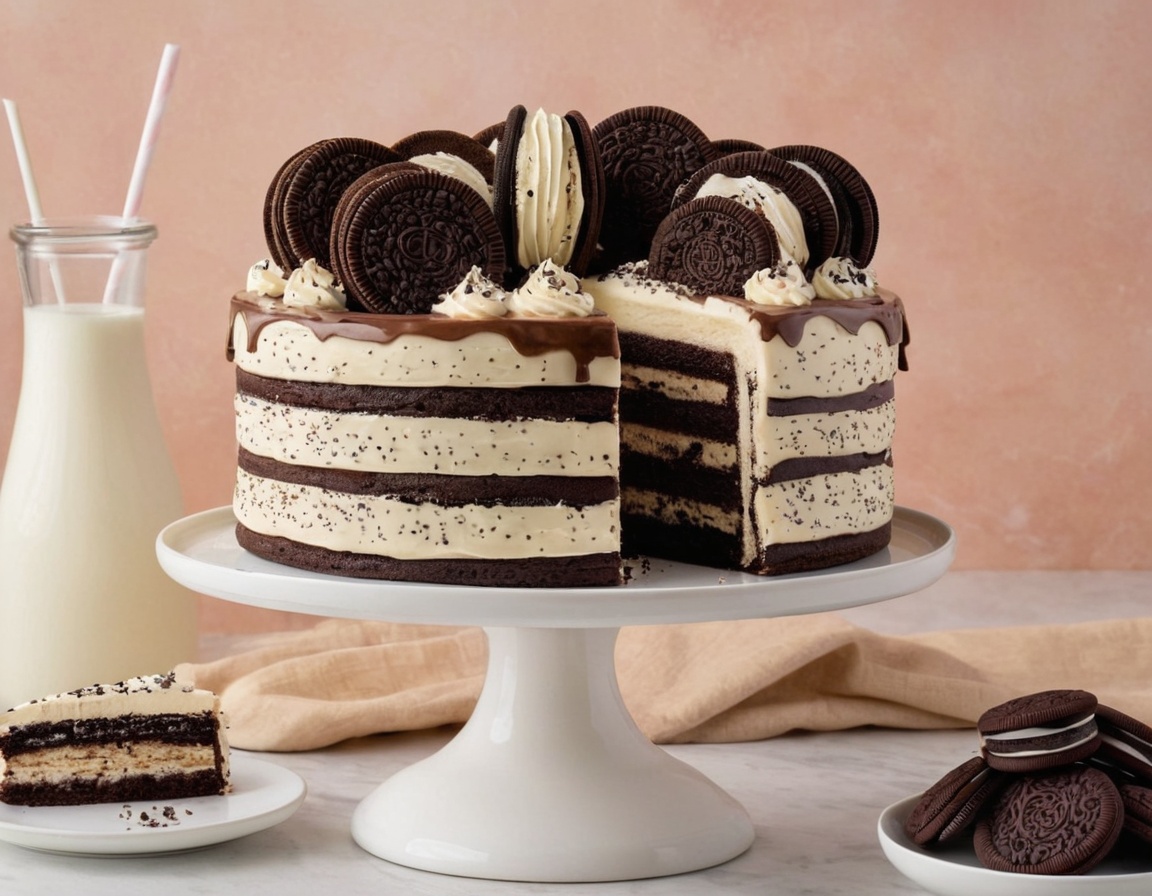
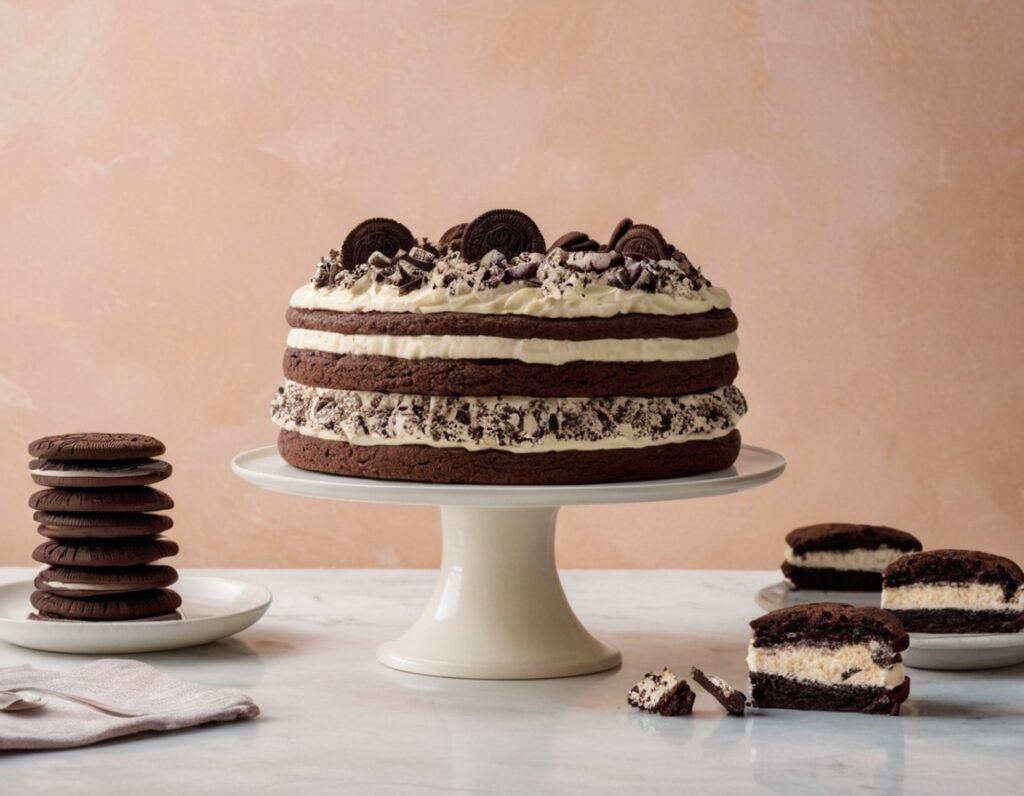
Cookies and Cream Cake Made Easy
There’s something universally nostalgic and indulgent about the combination of cookies and cream. Whether it reminds you of scooping up your favorite ice cream flavor or sneaking an Oreo from the snack drawer, that familiar blend of chocolate cookies and creamy filling is a flavor many of us hold dear. So, what better way to bring that memory to life than by transforming it into a decadent, crowd-pleasing dessert? Enter: the Cookies and Cream Cake.
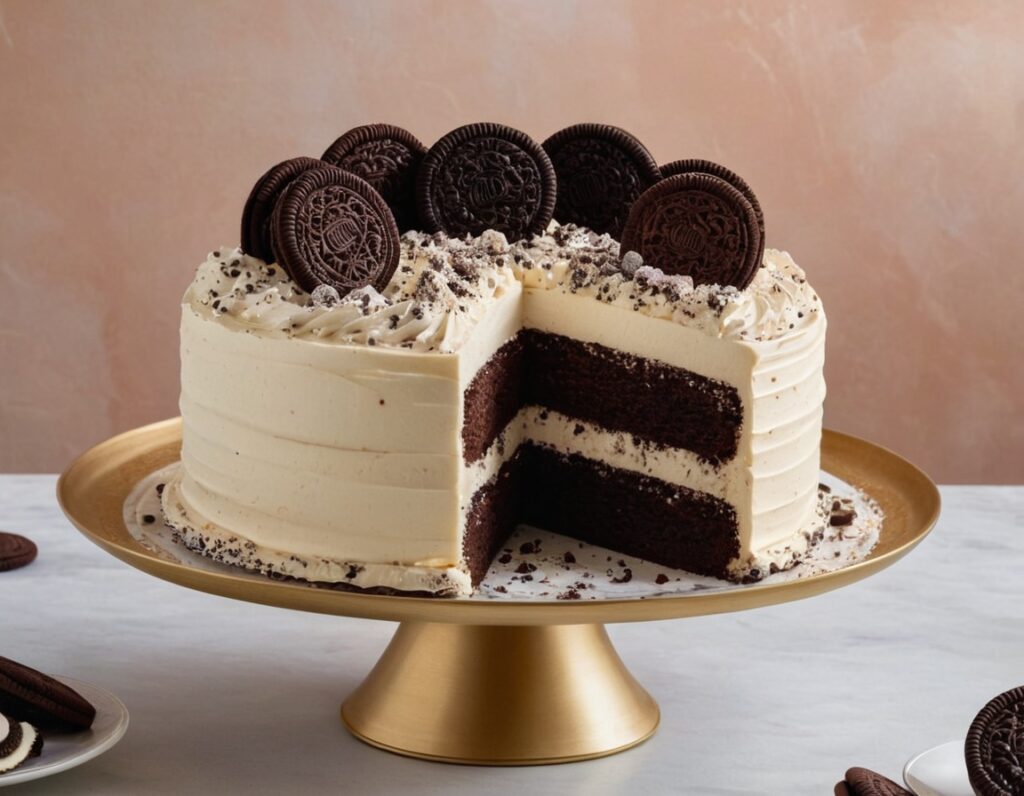
This cake isn’t just another layered dessert—it’s an elevated twist on a classic flavor combination, merging soft, moist vanilla or chocolate sponge with generous swirls of crushed cookies and a light, fluffy cookies-and-cream frosting. It’s ideal for birthdays, weekend treats, potlucks, or simply when you’re craving something sweet and nostalgic. The texture is a standout: fluffy yet rich, with bites of chocolate cookie adding that signature crunch.
The great thing about this cake is how adaptable it is. Want something a little lighter? Go with a whipped cream-based frosting. Prefer more richness? Use a thick cream cheese or buttercream base. This recipe offers plenty of room for customization, but the outcome is always the same: a visually stunning, perfectly balanced cake that tastes as good as it looks.
We’ll take you step-by-step through everything you need to make the ultimate Cookies and Cream Cake at home. Whether you’re a beginner baker or a seasoned kitchen pro, this cake is approachable, delicious, and destined to become a family favorite.
In the sections that follow, we’ll walk through what ingredients you’ll need, how to prepare and bake the cake, and how to frost and serve it like a pro. You’ll also get expert tips on storage, common mistakes to avoid, and answers to the most frequently asked questions from readers who’ve baked along. Get ready for a cake that’s as fun to make as it is to eat!
🧂 What You’ll Need
To make a truly memorable Cookies and Cream Cake, you’ll need a mix of standard baking staples and, of course, chocolate sandwich cookies—typically Oreos, or your favorite store-brand equivalent. This cake doesn’t require hard-to-find ingredients or special tools, which is part of its universal appeal. Let’s break down exactly what you’ll need for the cake batter, the frosting, and a few optional decorative extras to make it your own.
🧁 For the Cake Batter:
- 2 ½ cups (300g) all-purpose flour – Provides structure and helps hold the cookie pieces throughout the batter.
- 2 ½ teaspoons baking powder – Ensures the cake rises properly and has a light texture.
- ½ teaspoon baking soda – Gives extra lift and works with the acidity of the buttermilk.
- ½ teaspoon salt – Balances sweetness and enhances flavor.
- 1 cup (2 sticks) unsalted butter, softened – Adds richness and creates a tender crumb.
- 1 ¾ cups granulated sugar – Sweetens the cake and helps with moisture retention.
- 4 large eggs, room temperature – Provide structure and richness.
- 1 tablespoon vanilla extract – Deepens the flavor and complements the cookies.
- 1 cup buttermilk, room temperature – Keeps the cake moist and tender.
- 1 ½ cups crushed chocolate sandwich cookies – Gently folded into the batter for texture and flavor. Avoid pulverizing; aim for small chunks.
🍰 For the Frosting:
- 1 cup (2 sticks) unsalted butter, softened
- 4 cups powdered sugar (confectioners’ sugar)
- 2 tablespoons heavy cream or milk – Adjusts the frosting consistency.
- 1 teaspoon vanilla extract
- 1 ½ cups finely crushed chocolate sandwich cookies – Folded into the frosting for that classic cookies-and-cream look.
🍪 Optional Add-Ons:
- Whole or halved Oreos for topping or decorating the edges.
- Mini cookies for garnish.
- Chocolate ganache drizzle for an extra luxurious finish.
- Piping bag and star tip if you’d like to get fancy with your frosting swirls.
All ingredients should be brought to room temperature before baking. This ensures that the batter mixes evenly and the cake bakes consistently. It’s also worth using high-quality butter and real vanilla extract for the best flavor.

How to Make (Include Full Measurements)
Now that you have your ingredients ready, it’s time to bring this Cookies and Cream Cake to life. This recipe is easy to follow and yields a moist, flavorful cake layered with that irresistible cookies-and-cream texture. Let’s go step by step so you get a perfect bake every time.
✨ Step-by-Step Instructions
Step 1: Preheat and Prepare Pans
- Preheat your oven to 350°F (175°C).
- Grease and line two 9-inch round cake pans with parchment paper. This helps prevent sticking and ensures easy release.
Step 2: Mix the Dry Ingredients
In a medium bowl, whisk together:
- 2 ½ cups all-purpose flour
- 2 ½ teaspoons baking powder
- ½ teaspoon baking soda
- ½ teaspoon salt
Set this bowl aside.
Step 3: Cream Butter and Sugar
In a large mixing bowl or stand mixer:
- Cream 1 cup (2 sticks) unsalted butter with 1 ¾ cups granulated sugar on medium speed for 3–5 minutes, until pale and fluffy.
- Add 4 large eggs, one at a time, mixing well between additions.
- Stir in 1 tablespoon vanilla extract.
Step 4: Combine Wet and Dry
- Alternate adding the dry ingredients and 1 cup buttermilk to the creamed mixture, starting and ending with the dry.
- Mix just until combined—avoid over-mixing to keep the crumb tender.
Step 5: Add the Cookies
- Gently fold in 1 ½ cups crushed chocolate sandwich cookies using a spatula. Aim for small chunks, not fine crumbs.
Step 6: Divide and Bake
- Evenly divide the batter between the two prepared pans.
- Bake for 28–33 minutes, or until a toothpick inserted in the center comes out clean or with a few moist crumbs.
- Cool in the pans for 10 minutes, then turn out onto a wire rack to cool completely.
🍰 Make the Frosting
In a clean mixing bowl:
- Beat 1 cup unsalted butter until creamy.
- Add 4 cups powdered sugar, 2 tablespoons heavy cream or milk, and 1 teaspoon vanilla extract. Beat on low, then high, until fluffy.
- Fold in 1 ½ cups finely crushed Oreos.
🧁 Assemble the Cake
- Place one cake layer on your serving plate.
- Spread an even layer of frosting on top.
- Add the second layer and frost the top and sides.
- Decorate with halved Oreos, cookie crumbs, or a chocolate drizzle if desired.
Let the cake sit at room temperature for about 30 minutes before serving to allow the flavors to meld and the frosting to soften. Now you’re ready to enjoy!
Serving and Storage Tips
Cookies and Cream Cake is a showstopper dessert that’s best enjoyed at its freshest, but it also holds up well for storage and make-ahead options. Whether you’re serving it at a weekend birthday bash, holiday gathering, or a casual afternoon treat, here are your best strategies for serving and keeping it fresh.
🍰 Best Way to Serve
- Room Temperature is Key: For the best texture and flavor, let the cake sit out for about 20–30 minutes before serving. This allows the frosting to soften and the sponge to reach peak moisture and fluffiness.
- Slice with a Hot Knife: For clean slices, dip your knife in hot water and wipe it dry between each cut. This is especially helpful with frosting-heavy cakes.
- Pair with Sides: Serve with a cold glass of milk, a scoop of vanilla ice cream, or even a cookies-and-cream milkshake for a next-level dessert plate.
🧊 Storage Tips
Short-Term Storage (1–3 days):
- Keep the cake covered at room temperature in a cake dome or airtight container. If your kitchen is warm, it’s better to refrigerate it to keep the frosting stable.
Refrigerator Storage (up to 5 days):
- Place the cake in an airtight container or wrap it tightly in plastic wrap.
- Before serving from the fridge, allow the cake to sit out for about 30 minutes to bring it back to room temperature.
Freezer Storage (up to 2 months):
- Wrap individual slices or the entire cake (without delicate decorations) in two layers of plastic wrap followed by foil.
- Store in a labeled freezer-safe container.
- Thaw overnight in the fridge and bring to room temp before serving.
🍰 Make-Ahead Tips
- Bake Ahead: You can bake the cake layers up to two days ahead. Wrap them tightly in plastic wrap and store at room temperature or refrigerate.
- Frosting Ahead: The frosting can also be made 1–2 days in advance. Store in an airtight container in the fridge. When ready to use, let it come to room temperature and rewhip it until fluffy.
- Fully Frosted Cake: The entire cake can be frosted and decorated up to 24 hours in advance. Just cover and refrigerate until about 30 minutes before serving.
With proper care, this cake remains moist and flavorful for days, making it a great choice for parties and events where you want a dessert that holds up beautifully.
Mistakes to Avoid
Even the most delicious cakes can be derailed by a few common baking missteps. The Cookies and Cream Cake, while simple in concept, has specific requirements that can make or break the final result. From ingredient preparation to baking time and mixing technique, avoiding these common pitfalls will ensure your cake comes out perfectly every time.
1. Overmixing the Batter
One of the most frequent mistakes in baking cakes is overmixing the batter. Once the dry ingredients are added to the wet, it’s essential to mix just until combined. Overmixing activates the gluten in the flour, which can result in a dense, rubbery cake instead of a soft, tender crumb. Use a spatula or your mixer on low speed and stop as soon as the flour disappears into the batter.
2. Using Cold Ingredients
Cold butter, eggs, or buttermilk can throw off your mixing and baking. When ingredients are too cold, they don’t incorporate smoothly, which can lead to a lumpy batter or an uneven texture. Take time to bring your butter, eggs, and buttermilk to room temperature before starting. This step helps the ingredients emulsify properly, creating a consistent, fluffy texture.
3. Crushing the Cookies Too Finely
It may seem logical to crush the sandwich cookies into a powder, but that removes their signature texture from the cake. You want to maintain small chunks throughout the batter and frosting to capture the cookies-and-cream experience. Over-crushed cookies can also make the batter overly thick and compromise the look of the frosting.
4. Underbaking or Overbaking
An underbaked cake will sink in the center and may remain gummy inside. Overbaking, on the other hand, results in a dry cake. Use an oven thermometer if possible—most home ovens run slightly hot or cool. Start checking the cake at the 28-minute mark and test with a toothpick: it should come out with a few moist crumbs, not wet batter.
5. Skipping the Cooling Process
Don’t rush the cooling time before frosting the cake. A warm cake will cause your frosting to melt and slide off, ruining your presentation. Let your cake layers cool in the pan for 10 minutes, then completely on a wire rack before assembling.
6. Overloading the Frosting with Cookies
Yes, this is a cookies and cream cake—but resist the urge to go overboard with crushed cookies in the frosting. Too many chunks can make it difficult to spread evenly and can even break up your cake as you apply it.
Avoiding these common mistakes can mean the difference between a good cake and a spectacular one. Paying attention to the details ensures your Cookies and Cream Cake delivers on both taste and presentation.
💡 Tips and Tricks
Success in baking often lies in the little things—those behind-the-scenes techniques that experienced bakers rely on to elevate their desserts. Whether it’s a way to save time or a simple hack to improve texture and flavor, these tried-and-true tips will help you bake the most delicious and impressive Cookies and Cream Cake possible.
1. Use High-Quality Cookies
The flavor of this cake relies heavily on the cookies you choose. While Oreo is the go-to brand, don’t hesitate to try other high-quality chocolate sandwich cookies, including organic or gluten-free options, if needed. Be sure to taste the cookies before adding them—they should have a bold cocoa flavor and crisp texture.
2. Add a Touch of Sour Cream for Extra Moisture
For an even softer crumb, consider replacing ¼ cup of the buttermilk with sour cream. This adds moisture and a slight tang that enhances the creaminess of the frosting and balances the sweetness of the cake.
3. Use Cake Strips for Flat Layers
If you struggle with domed or uneven cake layers, invest in cake strips. These simple fabric bands, soaked in water and wrapped around your cake pans, help distribute heat evenly and reduce doming during baking. That means less trimming and more even frosting.
4. Chill the Cake Before Frosting
After your cake layers have cooled, wrap them in plastic wrap and refrigerate for at least 30–60 minutes. Cold layers are firmer and much easier to frost without breaking or tearing. Plus, chilled cake absorbs frosting more evenly.
5. Decorate with Texture in Mind
Use a mix of halved cookies, cookie crumbs, and piped frosting swirls to create visual interest. Consider adding texture to the sides with pressed cookie crumbs or layering mini cookies around the base for a bakery-worthy finish.
6. Pipe Frosting Like a Pro
If you’re using a piping bag, opt for a large star tip for dramatic swirls. Fill your bag only halfway to avoid messes, and twist the top to keep pressure consistent as you pipe.
7. Use an Offset Spatula for Smoothing
An offset spatula makes it easier to apply frosting smoothly and cleanly. Dip the spatula in warm water and wipe it dry for extra-smooth finishes.
8. Don’t Skip the Crumb Coat
Apply a thin “crumb coat” layer of frosting before the final application. This seals in any crumbs and gives your final frosting layer a pristine, polished appearance.
By using these practical tips, you’ll be able to bring a touch of bakery-style finesse to your homemade Cookies and Cream Cake. These little tweaks make a big difference in both the look and the taste of your finished dessert.
Suggestions
Cookies and Cream Cake is a crowd-pleaser by nature, but that doesn’t mean you have to stick strictly to the classic version. In fact, one of the best things about this cake is its flexibility. Whether you want to make it more festive, suit a dietary restriction, or simply try a new twist, there are plenty of creative ways to customize this dessert without losing its charm. Below are several thoughtful suggestions to help you make this cake your own, depending on your occasion or preferences.
🎉 Occasion-Based Customizations
Birthday Bash:
Amp up the fun by adding sprinkles to the cake batter or frosting for a “cookies and cream funfetti” experience. Top with birthday candles, colorful decorations, or even edible glitter. You could also layer in some mini chocolate chips for extra texture and a touch of indulgence.
Holiday Version:
Give this cake a seasonal spin by incorporating holiday flavors. During the winter months, add a hint of peppermint extract to the frosting and top with crushed candy canes for a festive take. For Halloween, use orange and black cookie-themed candies, or dye the frosting a spooky shade of grey.
Valentine’s Day Twist:
Use red velvet sandwich cookies instead of regular chocolate ones and tint the frosting pink. Garnish with heart-shaped sprinkles or drizzle with melted white chocolate for a romantic presentation.
🌱 Dietary Alternatives
Gluten-Free Option:
Swap the all-purpose flour with a 1-to-1 gluten-free baking blend, and be sure to use gluten-free chocolate sandwich cookies. The texture remains very close to the original when using a well-formulated flour substitute.
Dairy-Free Adjustments:
Replace the butter with plant-based margarine or vegan butter, and use almond milk with a splash of lemon juice in place of buttermilk. Be sure your chocolate sandwich cookies are also dairy-free (many store-brand options are).
Egg-Free Version:
You can use flax eggs (1 tablespoon ground flaxseed + 2.5 tablespoons water per egg, soaked for 5 minutes) or an egg replacer powder to make the cake vegan-friendly or allergy-safe.
🍓 Flavor Variations
Cookies and Cream Strawberry Cake:
Fold chopped fresh strawberries into the batter for a fruity boost. The strawberries pair well with the creamy vanilla and chocolate cookie base, adding color and a burst of freshness.
Chocolate Lover’s Edition:
Make it extra chocolatey by adding ¼ cup of cocoa powder to the flour mixture and folding in chopped milk or dark chocolate. Use chocolate frosting and decorate with double chocolate sandwich cookies.
Mini Versions:
Turn the recipe into cupcakes for individual servings. Bake in lined muffin tins for 18–20 minutes. This option is perfect for parties, bake sales, or school events.
These suggestions give you freedom to make the Cookies and Cream Cake a recurring favorite that feels fresh and new each time. Whether you’re baking for a dietary need, celebrating a special occasion, or just trying to experiment, there’s always a delicious new variation to try.
❓ FAQ
When making or serving Cookies and Cream Cake, you might run into a few questions—whether you’re a first-timer or a seasoned baker. This section answers the most commonly asked questions so you can bake with total confidence and avoid last-minute surprises.
Q1: Can I use store-brand cookies instead of name-brand Oreos?
Absolutely. While Oreo is the most popular option and delivers consistent results, many store-brand chocolate sandwich cookies work just as well. Just be sure they have a crisp texture and rich chocolate flavor. Avoid overly soft or cake-style cookies, as they may become soggy in the batter.
Q2: Can I make this cake in advance?
Yes! You can prepare the cake layers up to 2 days ahead and store them tightly wrapped in plastic wrap at room temperature or in the fridge. The frosting can also be made in advance and stored in the refrigerator. If you need the entire cake ready ahead of time, frost it fully and refrigerate it—just bring it to room temperature before serving for the best flavor and texture.
Q3: What’s the best way to crush the cookies?
Use a food processor for fine crumbs or a rolling pin to crush cookies in a zip-top bag for chunkier pieces. If adding to batter, aim for small chunks for the best texture. For the frosting, a finer crumb is better for smooth spreading.
Q4: Can I use chocolate cake instead of vanilla?
Definitely. A chocolate base creates a decadent variation of the original. Just replace a portion of the flour (about ¾ cup) with unsweetened cocoa powder and adjust the sugar slightly to balance the bitterness. You may also need to add a bit more liquid to compensate for cocoa’s drying effect.
Q5: How do I store leftover slices?
Store leftover slices in an airtight container at room temperature for up to 2 days or refrigerate for up to 5 days. For longer storage, wrap slices in plastic and foil and freeze for up to 2 months. Thaw overnight in the fridge and let sit at room temperature before enjoying.
Q6: Can I double the recipe?
Yes. This recipe scales well. For a larger crowd, double the ingredients and bake in a 9×13-inch pan or four round pans for a layer cake. Be sure to adjust baking time—larger cakes may need more time to fully cook through.
Conclusion
Cookies and Cream Cake is more than just a nostalgic treat—it’s a celebration of comfort, indulgence, and creativity in every bite. Whether you’re baking for a birthday, a family gathering, a potluck, or simply to treat yourself, this cake delivers an impressive blend of soft vanilla crumb, rich sandwich cookie crunch, and silky frosting that never fails to delight both kids and adults alike.
Its universal appeal lies in its balance: the sweetness of the frosting is offset by the slight bitterness of cocoa in the cookies, and the fluffy texture of the cake contrasts beautifully with the crunch of cookie pieces. It’s the kind of dessert that sparks joy on sight and even more once you take that first bite. And perhaps best of all, it’s a forgiving recipe that welcomes creativity and experimentation—meaning you can tailor it to suit just about any occasion or dietary need.
With the guidance provided in this blog post—from the careful list of ingredients and step-by-step instructions to expert tips, storage advice, and variation ideas—you’re fully equipped to bake this cake like a pro. The inclusion of FAQs and mistakes to avoid helps ensure a stress-free baking experience, even for beginners.
This Cookies and Cream Cake isn’t just another dessert—it’s a reliable go-to that’s sure to become part of your baking rotation. It’s ideal for last-minute gatherings or thoughtful celebrations and is as fun to decorate as it is to eat. The simplicity of its preparation also means it’s a great project for baking with kids, allowing them to help fold in cookies, decorate the top, or sneak a few cookie pieces for themselves.
If you’re looking to make something that’s visually impressive yet totally approachable, you can’t go wrong with this cake. It offers all the visual and flavor impact of a bakery-style dessert without the complexity or need for fancy equipment. Just a handful of staple ingredients, some chocolate sandwich cookies, and a bit of care are all it takes to create a dessert that everyone will remember.
We hope you give this recipe a try and fall in love with the result! Don’t forget to share your creation on social media or leave a comment below letting us know how it turned out. If you made any creative adjustments, we’d love to hear those too—your take might inspire someone else.
Until next time, happy baking—and may every slice bring smiles!