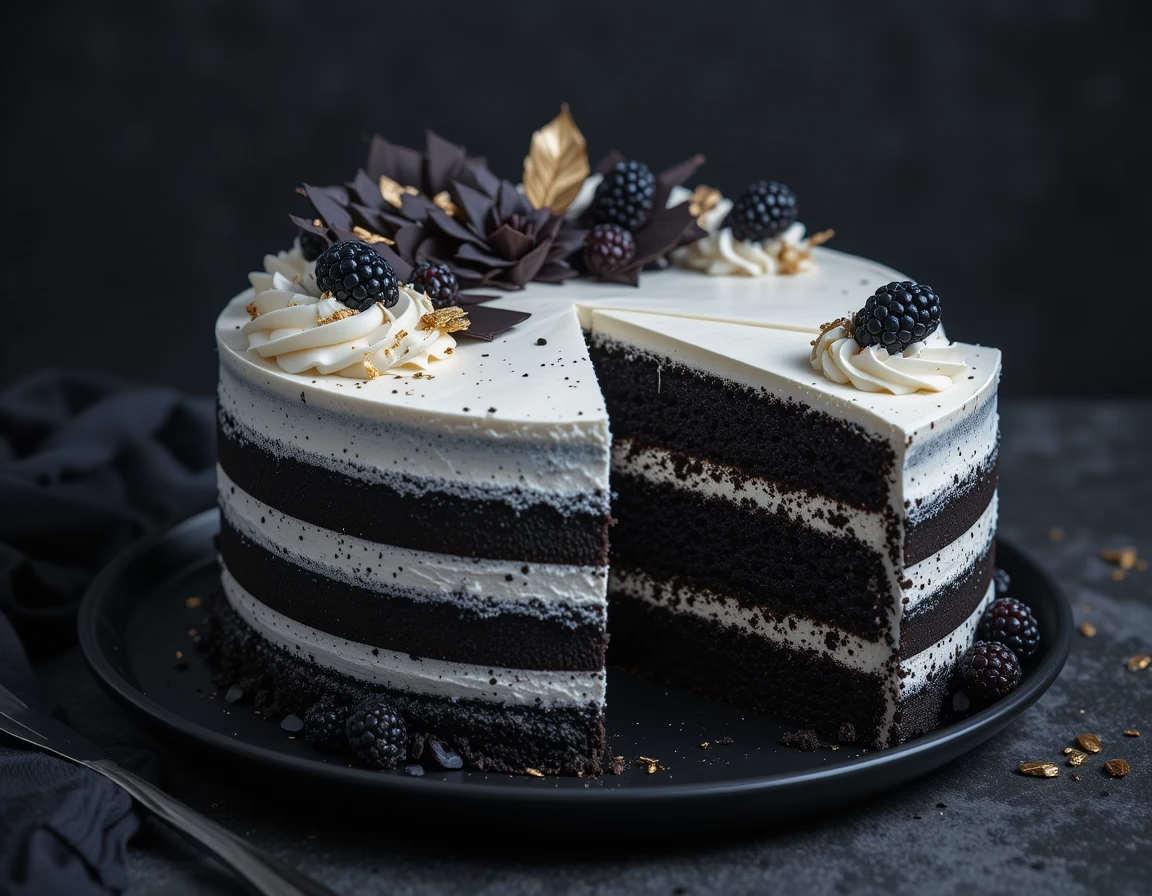
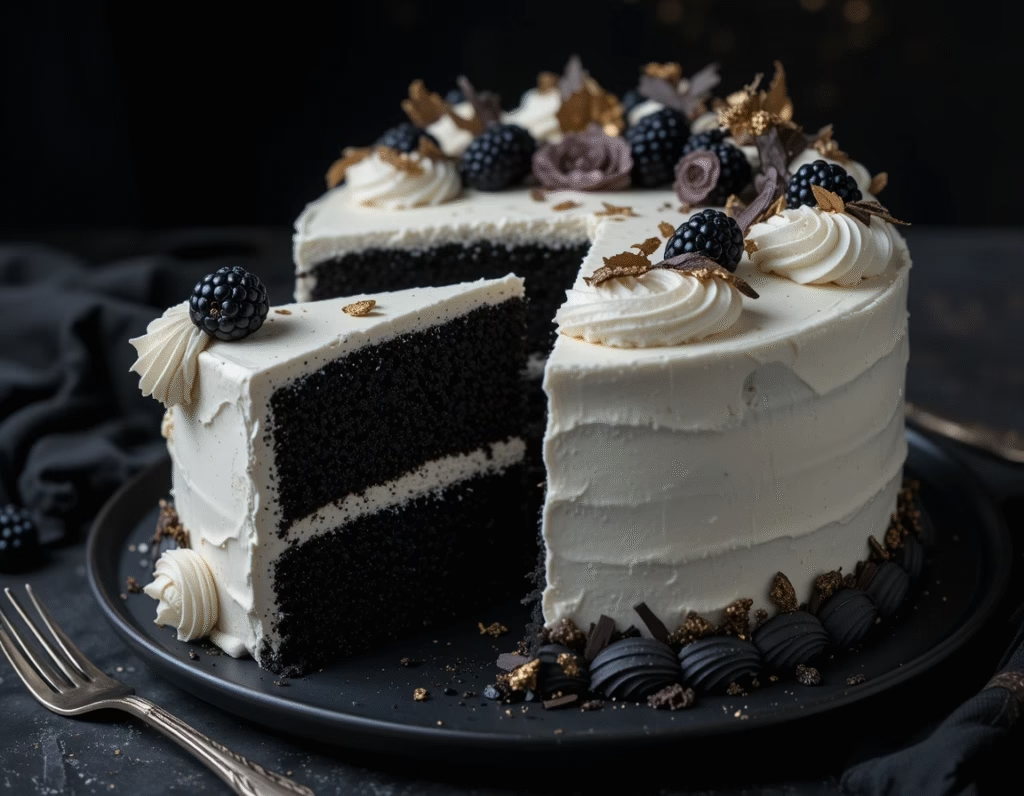
Decadent Black Velvet Cake Recipe
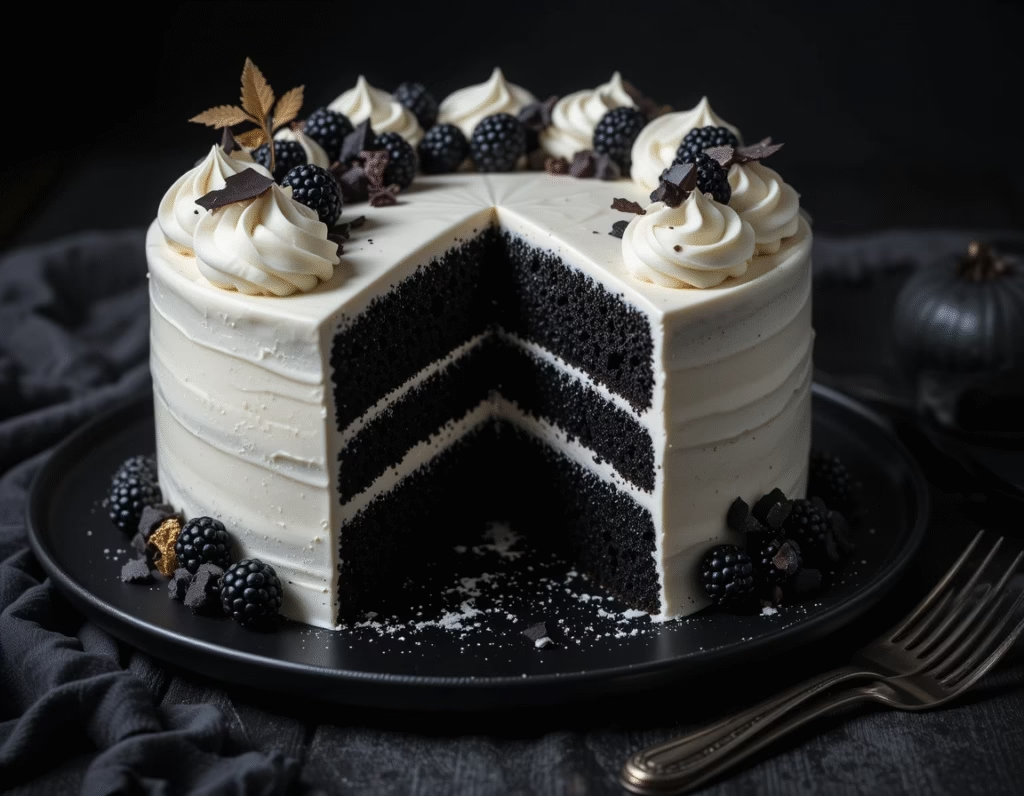
There’s something incredibly captivating about a Black Velvet Cake—from its dark, mysterious color to its rich, indulgent flavor and ultra-moist texture. This isn’t just any ordinary chocolate cake. A Black Velvet Cake brings together the elegance of a classic velvet texture with the depth of intense cocoa and a whisper of smooth vanilla, all wrapped in a decadent bite that leaves a lasting impression. If you’ve never tried baking a Black Velvet Cake, now is the perfect time to discover why this recipe deserves a permanent spot in your dessert rotation.
The appeal of a Black Velvet Cake lies not only in its stunning appearance but also in its exceptional mouthfeel. Unlike some dense chocolate cakes, this cake is surprisingly light and tender thanks to the balanced ratio of acidic buttermilk and leavening agents, which contribute to its signature velvety crumb. The result? A cake that’s deeply flavorful without being overpoweringly sweet or heavy—a trait that makes Black Velvet Cake perfect for birthdays, anniversaries, holidays, or just because.
Historically, Black Velvet Cake is considered a modern twist on the traditional red velvet cake. While red velvet became iconic thanks to its bright color and tangy cocoa flavor, the black version uses richer cocoa, often with black cocoa powder or Dutch-processed cocoa, to create a darker, more luxurious base. The absence of artificial coloring in a Black Velvet Cake makes it an appealing option for those seeking a more natural, dramatic dessert.
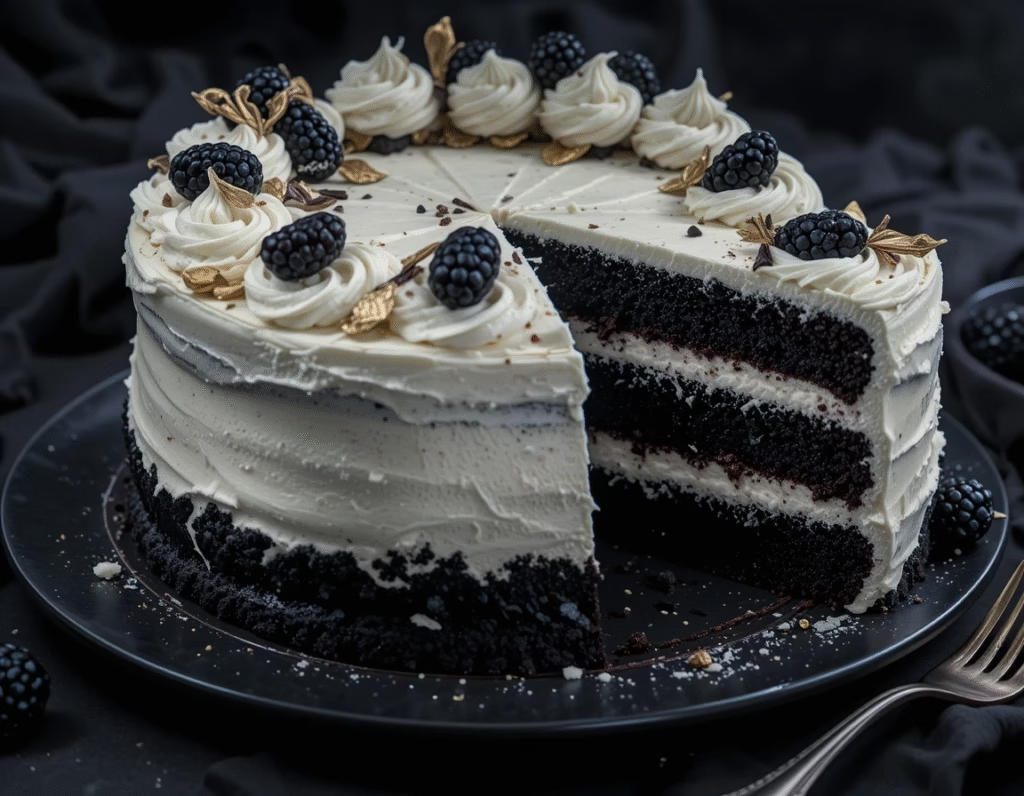
But there’s more to this cake than just its flavor and looks. A Black Velvet Cake is extremely versatile. You can serve it with a silky whipped cream, a dark chocolate ganache glaze, or a classic cream cheese frosting. It pairs beautifully with berries, coffee, or even a scoop of vanilla ice cream. The flavors develop even more intensely after a day or two, making it an excellent make-ahead dessert option.
In this comprehensive guide, you’ll learn everything you need to make the perfect Black Velvet Cake, from gathering the right ingredients to mastering the technique, to storing it for maximum freshness. Whether you’re a seasoned baker or new to the kitchen, our step-by-step breakdown will give you the confidence to tackle this elegant dessert and impress anyone lucky enough to have a slice. Let’s start with what you’ll need to make your own unforgettable Black Velvet Cake.
What You’ll Need
Before diving into the mixing bowl, it’s important to gather all your ingredients and tools to ensure a smooth baking experience. The ingredient list for a Black Velvet Cake is simple yet specific—each element plays a key role in creating the cake’s bold color, velvety texture, and rich flavor. To get the most out of your Black Velvet Cake, quality ingredients are essential.
Dry Ingredients:
- 1 ¾ cups all-purpose flour – Sifted for a fine crumb texture.
- ¾ cup black cocoa powder – This gives the Black Velvet Cake its signature color and flavor. If unavailable, use Dutch-processed cocoa.
- 1 ½ teaspoons baking soda
- ½ teaspoon baking powder
- ½ teaspoon salt – Enhances flavor balance.
Wet Ingredients:
- 1 cup buttermilk – Adds tang and moisture to the Black Velvet Cake.
- 2 large eggs – Room temperature is best for proper emulsification.
- 1 cup granulated sugar
- ½ cup brown sugar – Adds depth and richness to the flavor.
- ¾ cup neutral oil (like canola or vegetable oil) – Keeps the cake incredibly moist.
- 2 teaspoons pure vanilla extract – Enhances the chocolate tones.
- 1 cup freshly brewed black coffee (cooled) – Deepens the cocoa flavor and intensifies the black color naturally.
Optional Frosting:
- 8 oz cream cheese (softened)
- ½ cup unsalted butter
- 2 ½–3 cups powdered sugar
- 1 teaspoon vanilla extract
- A pinch of salt for balance
The combination of black cocoa powder and coffee is key to the character of a true Black Velvet Cake. Unlike alcohol-based flavorings or heavy liqueurs, the coffee enriches the flavor without overpowering the chocolate, and it’s entirely family-friendly. No need for rum or liqueur—just pure, intense cocoa taste.
Tools You’ll Need:
- Two 8-inch round cake pans or one 9×13 pan
- Parchment paper (to line pans)
- A stand mixer or electric hand mixer
- Mixing bowls (one large, one medium)
- Sifter for dry ingredients
- Cooling racks
Having everything in place before you start makes it easier to focus on each step as you build your delicious Black Velvet Cake. Now that you’re stocked and ready, let’s move on to the how-to so you can create this stunning cake with ease.
How to Make (Include Full Measurements)
Creating a moist, flavorful Black Velvet Cake from scratch might seem like a task reserved for professionals, but with the right method and a little patience, anyone can do it—right in their own kitchen. This step-by-step guide will walk you through the process of mixing, baking, and assembling the ultimate Black Velvet Cake that’s rich, tender, and unforgettable.
Step-by-Step Instructions:
1. Preheat and Prepare Your Pans
Begin by preheating your oven to 350°F (175°C). Grease two 8-inch round cake pans and line the bottoms with parchment paper to prevent sticking. You can also use a 9×13-inch rectangular pan if you prefer a single-layer cake.
2. Sift the Dry Ingredients
In a large mixing bowl, sift together the following:
- 1 ¾ cups all-purpose flour
- ¾ cup black cocoa powder
- 1 ½ teaspoons baking soda
- ½ teaspoon baking powder
- ½ teaspoon salt
Sifting ensures the cocoa and flour are lump-free and evenly combined—this is essential for that fine, velvety crumb every Black Velvet Cake is known for.
3. Mix the Wet Ingredients
In another large bowl or the bowl of a stand mixer:
- Beat 2 large eggs until frothy.
- Add 1 cup granulated sugar and ½ cup brown sugar.
- Beat in ¾ cup neutral oil (canola or vegetable oil).
- Mix in 2 teaspoons vanilla extract.
- Slowly add 1 cup buttermilk and stir gently to combine.
4. Combine the Mixtures
Add the sifted dry ingredients to the wet mixture in thirds, mixing gently between each addition. Don’t overmix—this can toughen your cake. Once the batter is mostly incorporated, slowly pour in 1 cup cooled black coffee. The batter will be slightly thin, which is perfect.
5. Pour and Bake
Divide the batter evenly into the prepared pans and tap lightly on the counter to release air bubbles. Bake for 28–32 minutes, or until a toothpick inserted in the center comes out clean. If using a 9×13 pan, baking time may extend to 35–38 minutes.
6. Cool and Frost
Allow cakes to cool in the pan for 10–15 minutes, then turn out onto wire racks to cool completely. Once cool, frost with a silky cream cheese frosting or a light whipped ganache.
With this technique, your Black Velvet Cake will have a moist interior, dark rich flavor, and a structure sturdy enough to layer, yet tender enough to melt in your mouth.
Serving and Storage Tips
Serving your Black Velvet Cake the right way can take the experience from delightful to divine. Whether you’re baking it for a formal celebration, a weekend treat, or meal-prep desserts, this cake adapts well to every situation. Here’s how to serve, store, and even freeze your Black Velvet Cake to enjoy it in its best form every time.
Serving Suggestions:
For the most satisfying experience, serve Black Velvet Cake at room temperature. When cold, the cocoa flavors tend to mute slightly, but once warmed to room temperature, the richness and depth of chocolate fully develop. If you’re using a frosting, especially one with cream cheese or whipped buttercream, remove the cake from the fridge about 30 minutes before serving.
You can serve Black Velvet Cake with:
- A generous swirl of cream cheese frosting for a tangy contrast.
- Fresh cherries or raspberries for brightness.
- A dollop of whipped cream for a lighter bite.
- Or a drizzle of chocolate ganache for ultra indulgence.
Slice using a warm, clean knife for perfect cuts—especially important for layered cakes.
How to Store:
If your Black Velvet Cake is frosted with cream cheese or dairy-based frosting, store it in the refrigerator. Wrap the cake tightly with plastic wrap or place it in an airtight cake container. It will stay fresh in the fridge for up to 4–5 days.
If the cake is unfrosted, you can store it at room temperature in a covered container for up to 2 days. This works well if you’re baking ahead and plan to frost later.
Freezing Tips:
Yes, you can absolutely freeze Black Velvet Cake, both frosted and unfrosted:
- Unfrosted layers: Once fully cooled, wrap each cake layer in plastic wrap, then in foil, and freeze for up to 3 months.
- Frosted cake: Slice, then freeze individual portions wrapped in parchment and plastic wrap. This is great for single servings later!
To thaw, move the wrapped cake from the freezer to the fridge overnight. Let it come to room temperature before serving.
Whether you’re enjoying a fresh slice or reheating a frozen piece, Black Velvet Cake keeps its luxurious texture and bold flavor beautifully. Follow these tips, and every bite will feel like it just came out of the oven.
Mistakes to Avoid
Baking the perfect Black Velvet Cake can feel intimidating, but many common mistakes are easily avoidable once you know what to watch out for. To help you succeed and produce that signature moist, tender crumb and deep chocolate flavor, here are the key pitfalls to avoid when making your Black Velvet Cake.
1. Skipping the Black Cocoa or Using the Wrong Cocoa Powder
The defining feature of a Black Velvet Cake is its rich, dark color and flavor, which comes from using black cocoa powder or Dutch-processed cocoa. Using regular natural cocoa powder will result in a lighter cake that lacks the dramatic velvet tone. Avoid substituting unless you adjust the recipe accordingly.
2. Not Sifting the Dry Ingredients
Sifting the flour, cocoa, baking soda, and baking powder ensures even distribution and removes lumps. Skipping this step can cause uneven rising or dense spots in your Black Velvet Cake. Always sift for that smooth, velvety crumb.
3. Overmixing the Batter
Overmixing can develop gluten in the flour, making your Black Velvet Cake tough or chewy rather than soft and tender. Mix just until the ingredients come together. It’s normal for the batter to be a bit lumpy or thin due to the coffee addition.
4. Using Hot Coffee
Coffee intensifies the chocolate flavor in your Black Velvet Cake, but if it’s too hot when added, it can affect the leavening and batter texture. Always use cooled, freshly brewed coffee.
5. Ignoring Oven Temperature and Baking Time
Every oven is different. Baking at too high a temperature can dry out or burn the edges of your Black Velvet Cake while leaving the center undercooked. Use an oven thermometer to check your oven’s accuracy and test doneness with a toothpick.
6. Frosting a Warm Cake
Applying frosting to a cake that hasn’t cooled completely will cause melting and sliding. Your Black Velvet Cake layers should be at room temperature before frosting to maintain structure.
7. Not Preparing Pans Properly
Without greasing and lining pans, your Black Velvet Cake may stick, damaging the crumb during removal. Always prepare pans with parchment and a light layer of grease.
Avoiding these mistakes will set you up for baking success and help you enjoy every luscious bite of your Black Velvet Cake without stress.
Tips and Tricks
Mastering the art of baking a flawless Black Velvet Cake means knowing a few insider tips and tricks that elevate your results from good to outstanding. These practical strategies will ensure your cake is rich, moist, and beautifully textured every time.
1. Use Fresh Ingredients
Always check the freshness of your baking powder, baking soda, and cocoa powder. Old or expired ingredients can lead to flat or flavorless Black Velvet Cake.
2. Room Temperature Eggs and Buttermilk
Cold eggs or buttermilk can cause your batter to seize or curdle. For smooth mixing and better aeration, bring them to room temperature before starting your Black Velvet Cake batter.
3. Coffee Enhances Flavor
Don’t skip the coffee! Brew fresh black coffee and cool it before adding to the batter. Coffee doesn’t add a strong coffee taste—it simply amplifies the cocoa’s richness in your Black Velvet Cake.
4. Layer Cake Pans Evenly
If using two round pans, weigh the batter and divide it evenly to ensure uniform layers. This helps your Black Velvet Cake stack nicely for a professional look.
5. Chill the Cake Before Frosting
For easier frosting, chill your Black Velvet Cake layers for 20–30 minutes. Cold cake crumbles less and allows for smoother icing application.
6. Experiment with Frostings
While classic cream cheese frosting pairs beautifully with Black Velvet Cake, you can also try whipped chocolate ganache or a silky buttercream to vary the flavor and texture.
7. Decorate with Fresh Fruit or Chocolate Shavings
Garnish your cake with fresh cherries, raspberries, or chocolate curls for a stunning presentation that complements the flavors.
8. Bake a Day Ahead
Black Velvet Cake often tastes better the next day as flavors meld and moisture distributes evenly. Bake ahead and wrap tightly.
9. Store Properly to Retain Moisture
Keep your cake tightly covered at room temperature or refrigerated, depending on the frosting, to maintain softness and freshness.
Using these tips and tricks, your Black Velvet Cake will impress guests and satisfy your craving for a decadent, elegant dessert every time.
Not sure how to level or layer cakes? We cover that in our Cookies and Cream Cake Made Easy
Suggestions
When it comes to enjoying your Black Velvet Cake, the possibilities for creativity and pairing are endless. Whether you want to serve it at a special occasion, create a themed dessert spread, or adapt it for different tastes, these suggestions will help you make the most of this rich and luscious cake.
1. Perfect for Celebrations
The elegant deep color and velvety texture of Black Velvet Cake make it a showstopper for birthdays, anniversaries, or holiday gatherings. Pair it with matching décor or themed table settings to elevate the experience. Consider adding personalized cake toppers or fresh flowers for an extra touch of sophistication.
2. Pair with Coffee or Tea
The bold cocoa flavor of Black Velvet Cake pairs beautifully with hot beverages. A freshly brewed cup of coffee or a fragrant black tea complements the cake’s richness and balances sweetness. For a non-caffeinated option, try a warm vanilla rooibos or chai tea.
3. Try Different Frosting Variations
While cream cheese frosting is a classic, feel free to experiment. A rich chocolate ganache, a light whipped cream frosting, or even a mascarpone-based frosting can change the flavor profile and texture. You can also add a touch of orange zest or espresso powder to your frosting to enhance the cake’s chocolate depth.
4. Add Fruit Accents
Fresh or preserved fruits like cherries, raspberries, or blackberries add freshness and visual appeal to your Black Velvet Cake. You can incorporate fruit layers, serve fruit on the side, or decorate the top with fruit compote or jam for a tangy contrast.
5. Make Mini Versions
For parties or gatherings, consider making Black Velvet Cake cupcakes or mini cakes. These are easy to serve and perfect for portion control without sacrificing flavor.
6. Use as a Base for Dessert Trifles
Layer cubes of Black Velvet Cake with whipped cream, fruit, and chocolate chips for an indulgent trifle dessert. This is a great way to use leftover cake or present it in a new way.
7. Incorporate Dietary Adjustments
If you have dietary preferences or restrictions, you can experiment with gluten-free flour blends or dairy-free cream cheese alternatives to enjoy a version of Black Velvet Cake that suits your needs without losing the essence of the original.
With these suggestions, your Black Velvet Cake can adapt to many occasions and tastes, always remaining a decadent favorite.
FAQ
Below are some frequently asked questions about the Black Velvet Cake that many bakers have when making this delicious dessert. These answers will guide you through common concerns and tips.
Q1: What is the difference between Black Velvet Cake and Red Velvet Cake?
While both cakes have a velvety texture and are cocoa-based, Black Velvet Cake uses black cocoa powder which gives it a much darker color and a deeper chocolate flavor. Red Velvet Cake typically has a reddish hue and a milder cocoa flavor, often paired with cream cheese frosting.
Q2: Can I substitute the black cocoa powder with regular cocoa powder?
Substituting regular cocoa powder will result in a lighter colored cake and less intense flavor. If you can’t find black cocoa, Dutch-processed cocoa is the closest alternative. However, for the authentic Black Velvet Cake look and taste, black cocoa is preferred.
Q3: How long does Black Velvet Cake last?
When properly stored, frosted Black Velvet Cake will stay fresh in the refrigerator for up to 4-5 days. Unfrosted layers can last 2 days at room temperature or be frozen for up to 3 months.
Q4: Can I make this cake dairy-free?
Yes, by using dairy-free cream cheese or frosting alternatives and substituting buttermilk with plant-based milk plus lemon juice, you can make a dairy-free version of Black Velvet Cake without compromising much on taste.
Q5: Why is coffee used in the recipe?
Coffee enhances the chocolate flavor of the black cocoa without imparting a strong coffee taste. It deepens the richness of the cake, making the cocoa notes more pronounced.
Q6: How do I know when the cake is done baking?
Insert a toothpick into the center of the cake; if it comes out clean or with a few moist crumbs (not wet batter), your Black Velvet Cake is done. Avoid overbaking to keep the cake moist.
Q7: Can I freeze Black Velvet Cake?
Absolutely. Both frosted and unfrosted cakes freeze well when wrapped tightly. Thaw in the refrigerator overnight before serving.
If you have more questions about baking or serving your Black Velvet Cake, feel free to ask!
Conclusion
In conclusion, the Black Velvet Cake stands out as an exquisite dessert that combines a deep, intense chocolate flavor with a luxurious, velvety texture that delights every bite. Whether you’re a seasoned baker or just starting your cake-making journey, this cake offers a perfect balance of elegance and ease, making it an ideal choice for celebrations, gatherings, or simply indulging your sweet tooth at home.
The secret to this cake’s unique appeal lies in the special black cocoa powder, which provides its signature dark color and rich flavor that sets it apart from the traditional red velvet or classic chocolate cakes. Paired with the right frosting—typically a smooth cream cheese or decadent ganache—this cake becomes a showstopper both visually and in taste.
Throughout this blog, you’ve discovered the essential ingredients and precise measurements needed to create the perfect Black Velvet Cake, along with detailed steps to ensure your baking process goes smoothly. We’ve also covered important tips and tricks to avoid common mistakes, ensuring your cake turns out moist, tender, and beautifully layered every time.
Storage and serving guidance have been provided so your cake stays fresh and delicious for days, whether you prefer to enjoy it immediately or prepare it ahead for a special occasion. Additionally, suggestions for pairing and decorating offer creative ways to make this cake uniquely yours, whether by incorporating fresh fruits, experimenting with frostings, or transforming the cake into mini cupcakes or trifles.
By following these guidelines and embracing the artistry of baking, you can confidently make a Black Velvet Cake that will impress friends and family and satisfy any chocolate lover’s cravings. This cake not only tastes divine but also brings warmth and joy to any table.
Thank you for joining me on this baking journey. I hope your experience with the Black Velvet Cake recipe is rewarding and inspires you to explore more delicious desserts in the future. Happy baking and bon appétit!