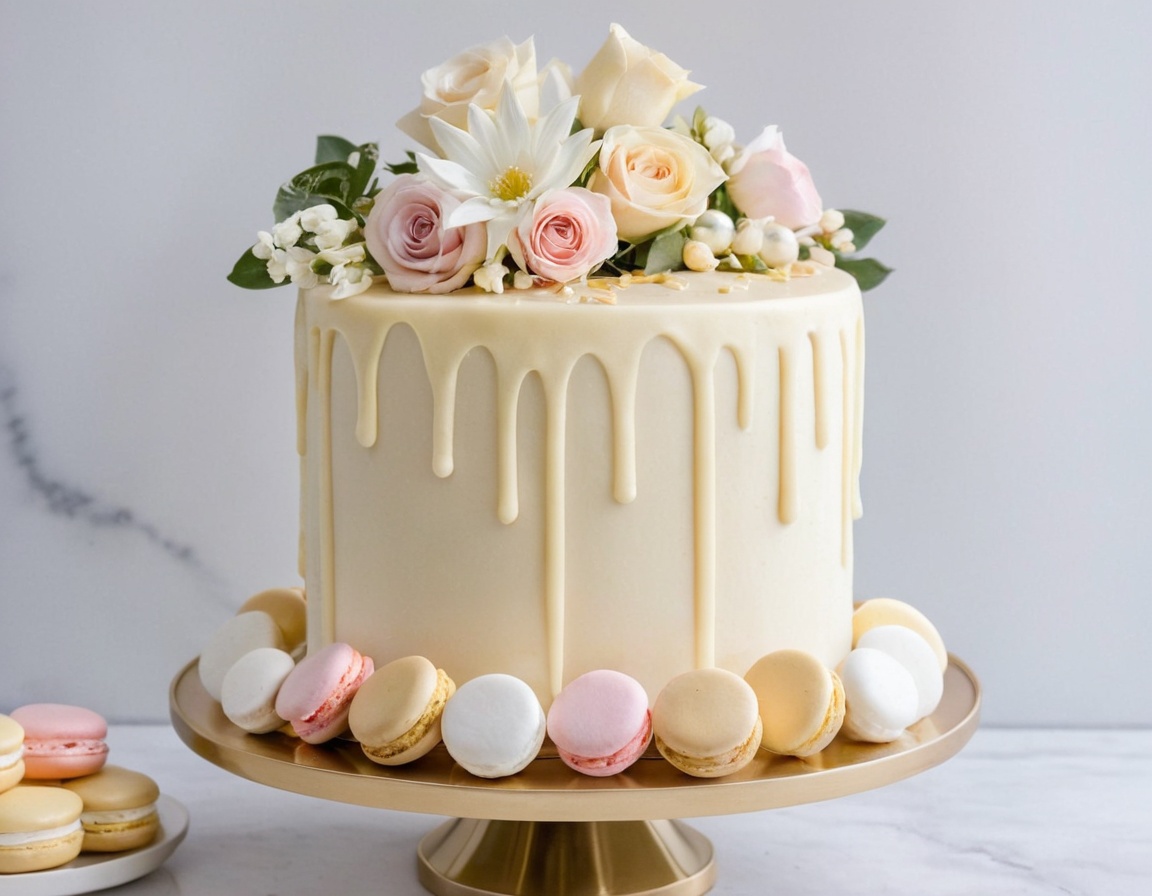
Elegant White Chocolate Drip Cake Recipe
There’s something undeniably elegant about a cake adorned with a silky white chocolate drip. Whether you’re celebrating a birthday, bridal shower, anniversary, or simply indulging your sweet tooth, a White Chocolate Drip Cake adds a touch of sophistication and indulgence to the occasion. Its rich yet delicate flavor, smooth texture, and eye-catching presentation make it a standout centerpiece for any dessert table.
Unlike dark or milk chocolate, white chocolate brings a unique creaminess with sweet, buttery notes that pair beautifully with a variety of cake bases—vanilla, lemon, raspberry, almond, or even red velvet. Its versatility makes it ideal for those who want to break away from the more traditional chocolate-heavy desserts while still delivering a luxurious, melt-in-your-mouth experience. Plus, the pale, glossy drip opens a canvas for creative decoration—whether you’re going for simple elegance or a colorful, festive theme.
White chocolate is sometimes misunderstood in baking. While technically not “chocolate” in the purest sense due to its lack of cocoa solids, it still contains cocoa butter and sugar, giving it a smooth texture and unique melting behavior that requires special care when used as a drip. This blog post will walk you through exactly how to prepare it correctly so it glides beautifully down the sides of your cake without seizing or becoming too thick.
Beyond the drip itself, we’ll also cover the cake’s interior—because a beautiful exterior is only half the story. Whether you choose a fluffy vanilla sponge or a moist lemon layer cake, the recipe you’ll find here is well-balanced and structured to work seamlessly with the richness of the white chocolate topping. And if you’re looking to fill the inside with fresh fruit, buttercream, or even a white chocolate mousse, you’ll find guidance for that too.
So whether you’re an experienced baker or trying your first layer cake, this blog will guide you step-by-step through the process of creating a showstopping White Chocolate Drip Cake. By the end, you’ll feel confident not only in your baking skills but also in your ability to transform a simple dessert into an impressive visual (and flavorful) delight.
Let’s dive in and explore exactly what you’ll need to bring this stunning cake to life.
🛒 What You’ll Need
Before you preheat your oven or start melting chocolate, it’s important to gather all the right ingredients and tools to ensure a smooth baking experience. The White Chocolate Drip Cake is best built with attention to detail, especially when it comes to measurements and preparation. Here’s everything you’ll need to make both the cake base and the signature white chocolate drip.
🧁 Ingredients for the Cake
For a reliable, versatile cake base that pairs beautifully with white chocolate, a vanilla or almond sponge works best. Here’s a classic vanilla base that serves as the foundation of this recipe:
- 2 ½ cups (315g) all-purpose flour
- 2 ½ tsp baking powder
- ½ tsp salt
- 1 cup (227g) unsalted butter, softened
- 1 ¾ cups (350g) granulated sugar
- 4 large eggs, room temperature
- 1 tbsp pure vanilla extract
- 1 cup (240ml) whole milk, room temperature
For variation, you can add:
- 1–2 tsp almond extract for a nuttier flavor
- Zest of 1 lemon for a citrus kick
🎂 Ingredients for the White Chocolate Drip and Frosting
For the ganache drip:
- ½ cup (120ml) heavy cream
- 6 oz (170g) high-quality white chocolate, chopped finely
For the buttercream (enough to frost and fill a three-layer 8-inch cake):
- 1 ½ cups (340g) unsalted butter, softened
- 5–6 cups (600–720g) powdered sugar, sifted
- 2 tsp vanilla extract
- 2–3 tbsp whole milk or heavy cream (adjust for consistency)
🍴 Tools You’ll Need
- 3 8-inch round cake pans
- Electric mixer (stand or hand)
- Offset spatula
- Bench scraper or cake smoother
- Microwave-safe or heatproof bowl for ganache
- Piping bags (optional)
- Cake turntable (optional but helpful)
- Cooling rack
Having these items prepared and measured ahead of time ensures a smooth process and better results. It also makes the decorating step—especially the drip—much easier since timing and temperature matter for a flawless finish.
In the next section, we’ll go step-by-step through how to bring it all together, from mixing the batter to that perfect white chocolate drip.
How to Make White Chocolate Drip Cake (Full Measurements Included)
This section will guide you step-by-step through baking the perfect base, frosting it smoothly, and achieving a picture-perfect white chocolate drip. Don’t worry if you’re not an expert—this method is designed to be approachable while still producing bakery-quality results.
🧁 Step 1: Prepare Your Cake Pans and Oven
Start by preheating your oven to 350°F (175°C). Grease and line three 8-inch round cake pans with parchment paper to ensure easy release. If using only two pans, you may need to bake in batches or extend baking time slightly.
🥣 Step 2: Mix the Dry Ingredients
In a large bowl, sift together:
- 2 ½ cups (315g) all-purpose flour
- 2 ½ tsp baking powder
- ½ tsp salt
Mix well to evenly distribute the leavening.
🧈 Step 3: Cream Butter and Sugar
In a separate large mixing bowl (or stand mixer with paddle attachment), cream together:
- 1 cup (227g) unsalted butter, softened
- 1 ¾ cups (350g) granulated sugar
Beat on medium-high for 3–4 minutes until light and fluffy. This adds air to the batter and ensures a soft crumb.
🥚 Step 4: Add Eggs and Vanilla
Add the eggs one at a time, beating well after each addition:
- 4 large eggs, room temperature
Then stir in: - 1 tbsp pure vanilla extract
For a flavor twist, you can substitute ½ tbsp almond extract for half the vanilla or add the zest of 1 lemon for a citrusy boost.
🥛 Step 5: Combine Dry and Wet Ingredients
Alternate adding the dry ingredients with:
- 1 cup (240ml) whole milk, room temperature
Begin and end with the dry mixture. Beat on low until just combined to avoid overmixing.
🔥 Step 6: Bake the Cakes
Divide the batter evenly between your prepared pans and bake for 25–30 minutes, or until a toothpick inserted in the center comes out clean. Let cool in pans for 10 minutes, then turn out onto a wire rack to cool completely.
🧁 Step 7: Make the Buttercream
While cakes are cooling, prepare the frosting:
- 1 ½ cups (340g) unsalted butter, softened
- 5–6 cups (600–720g) powdered sugar, sifted
- 2 tsp vanilla extract
- 2–3 tbsp whole milk or heavy cream
Beat butter until pale and creamy, then slowly add powdered sugar. Add vanilla and cream until your desired texture is reached.
🍫 Step 8: Assemble and Crumb Coat
Level your cake layers if needed. Stack layers with a thick layer of buttercream between each. Use a thin layer to crumb coat the outside. Chill for 20–30 minutes to set.
🍥 Step 9: Final Coat and Smooth Finish
Apply the final layer of buttercream. Use an offset spatula and a bench scraper for smooth edges. Return to the fridge for 15–20 minutes before adding the drip.
🍶 Step 10: Make the White Chocolate Drip
Heat ½ cup (120ml) heavy cream in the microwave or on the stove until just simmering (not boiling). Pour over:
- 6 oz (170g) finely chopped white chocolate
Let sit for 2 minutes, then stir until smooth. Let cool slightly (it should be pourable but not runny).
💧 Step 11: Add the Drip
Use a spoon or piping bag to gently add the ganache to the edges of your chilled cake. Start with a little and let it drip naturally. Fill in the center afterward and smooth.
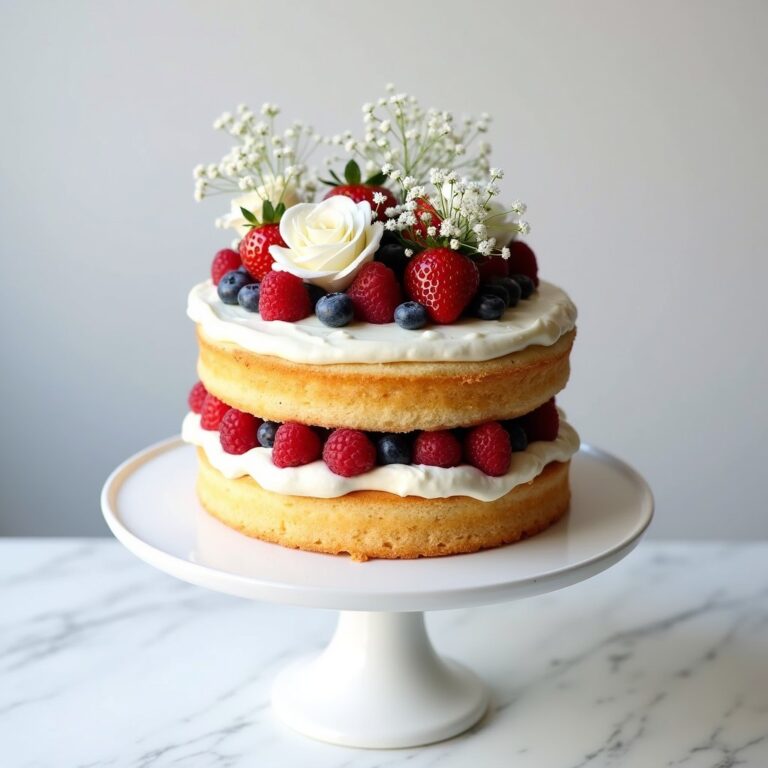
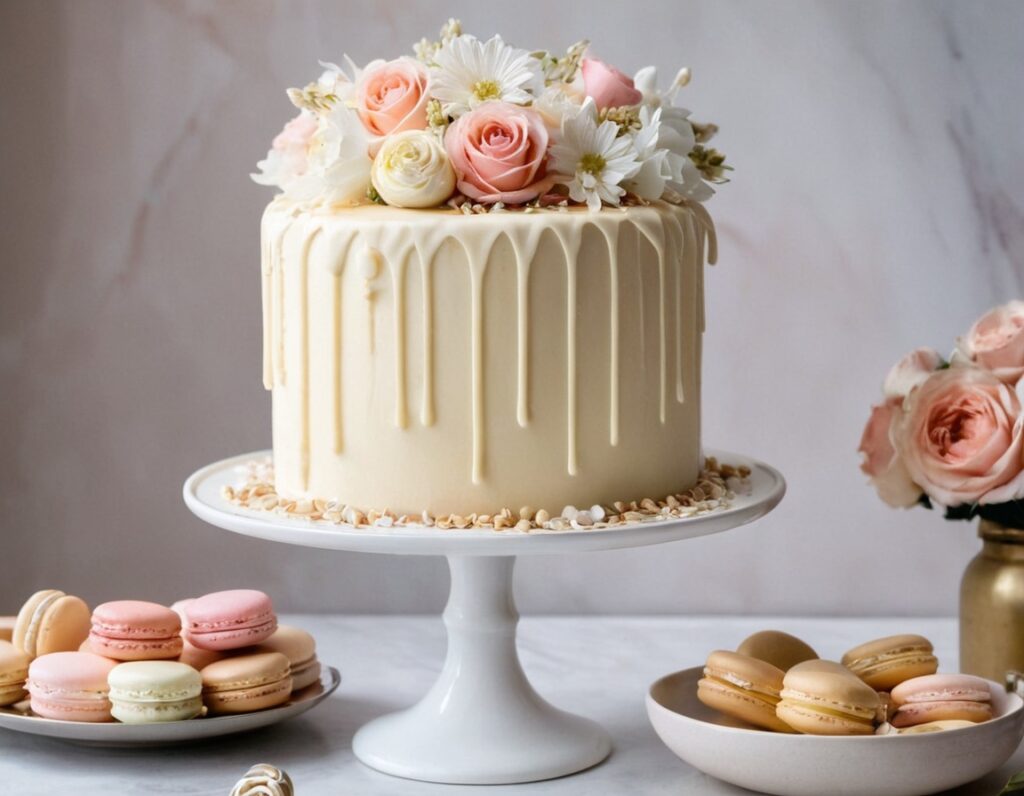
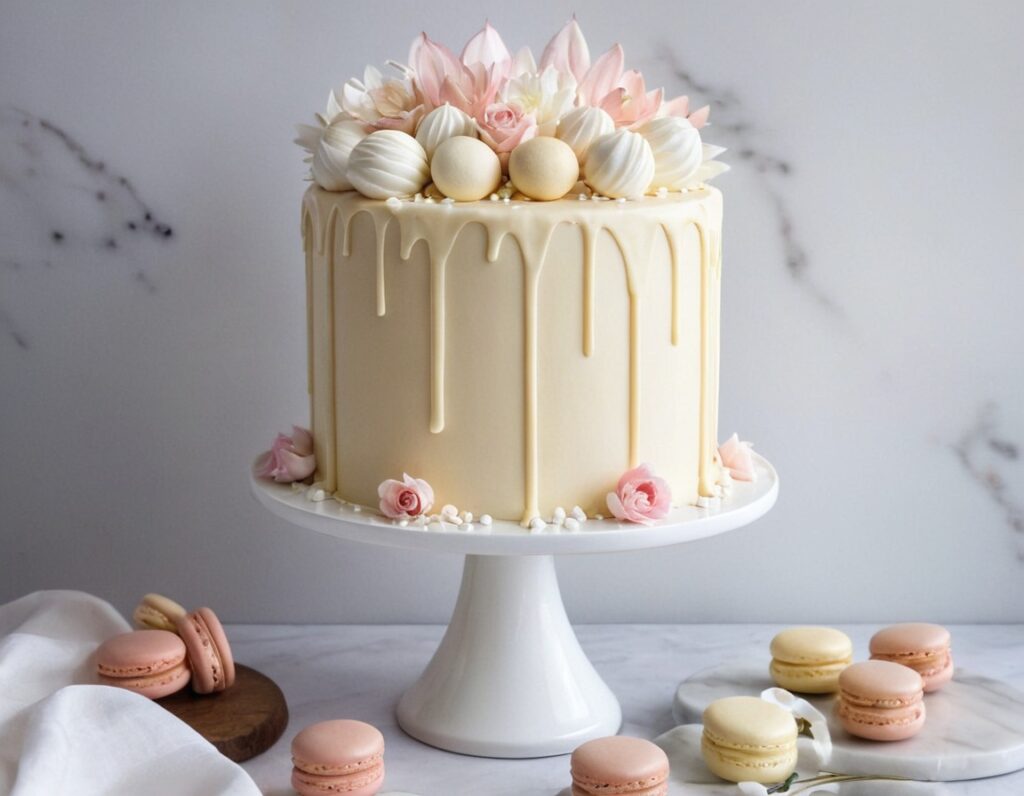
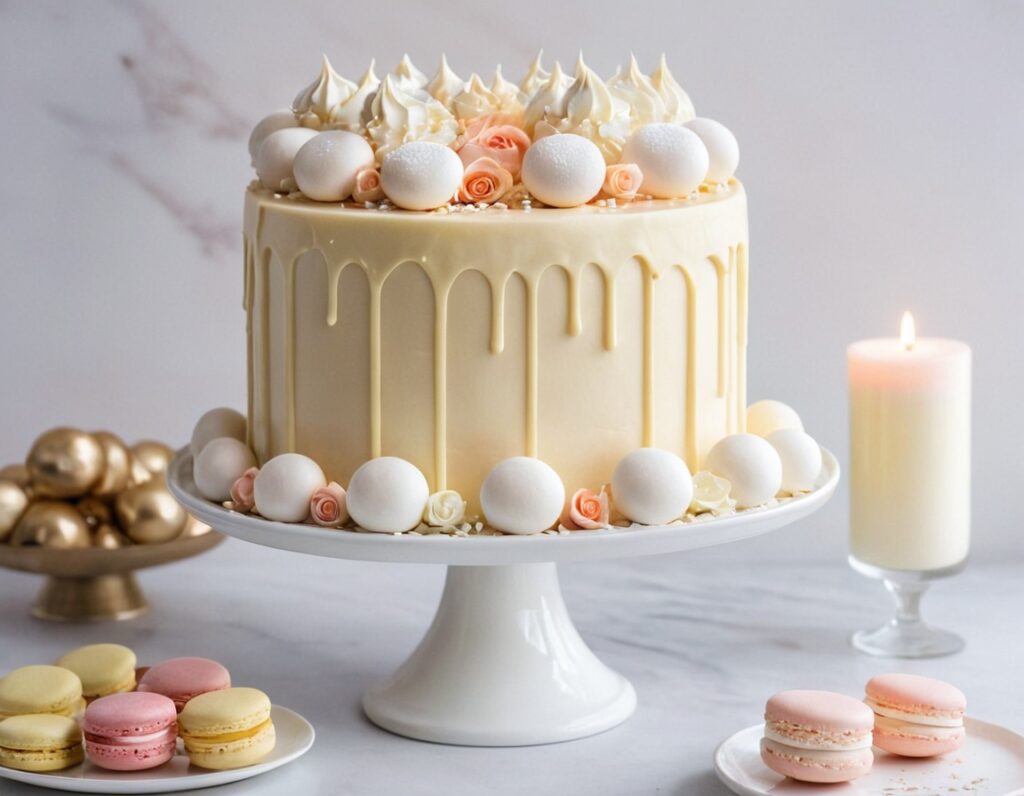
Let the drip set for 10–15 minutes. Garnish with sprinkles, shaved white chocolate, berries, or edible flowers for extra flair.
🍰 Serving and Storage Tips
Once your White Chocolate Drip Cake is beautifully finished, the next step is serving it properly and storing any leftovers. Whether you’re planning for a party, event, or just enjoying a slice at home, these tips will help maintain the cake’s flavor, texture, and presentation.
🍴 Best Ways to Serve
- Temperature matters: This cake is best served at room temperature. Cold buttercream and ganache can become firm when refrigerated, so remove the cake 30–45 minutes before serving to soften the textures without melting the drip.
- Slicing cleanly: Use a sharp, non-serrated knife for smooth slices. To keep the blade clean between cuts, dip it into warm water and wipe with a towel.
- Portion guide: An 8-inch, three-layer cake serves about 12–16 people depending on how generously you slice it. For larger parties, consider smaller slices served with fruit or ice cream on the side.
🧊 Storing the Cake
- Room temperature (short-term): The frosted cake (with or without the ganache) can be left at room temperature for up to 24 hours, as long as it’s in a cool environment (under 72°F) and covered with a cake dome or plastic wrap.
- Refrigeration (longer storage): For longer shelf life, refrigerate the cake in an airtight container or covered with plastic wrap. It will stay fresh for up to 5 days. Bring to room temp before serving.
- Freezing instructions: You can freeze both the unfrosted cake layers and the fully frosted cake:
- Cake layers: Wrap each layer tightly in plastic wrap and foil. Freeze for up to 2 months. Thaw at room temperature before frosting.
- Frosted cake: Freeze on a baking sheet uncovered until firm, then wrap in plastic wrap and foil. Thaw overnight in the fridge, then let sit at room temp before serving.
🎉 Make-Ahead Options
- Bake ahead: You can bake and freeze the cake layers a week or two in advance. Just thaw and frost when ready.
- Drip prep: White chocolate ganache can be made ahead and stored in the fridge for up to 1 week. Warm gently in 10-second intervals in the microwave before using.
🧁 Leftover Ideas
If you have leftover cake slices, consider:
- Turning them into cake pops
- Crumbling and layering into parfaits
- Serving with fresh fruit and whipped cream for a mini trifle
These ideas help reduce waste and offer creative ways to enjoy every last bite of this indulgent dessert.
Mistakes to Avoid
Creating a showstopping White Chocolate Drip Cake may seem intimidating at first, especially for home bakers who are new to ganache drips or multi-layered cakes. However, many of the most common mistakes are easy to avoid with a bit of awareness and planning. Here’s a thorough look at what not to do—and how to steer clear of pitfalls during baking, frosting, and decorating.
1. Using the Wrong White Chocolate
One of the biggest reasons white chocolate drip cakes fail is using low-quality or baking chips rather than real white chocolate. Many baking chips or candy melts contain added stabilizers that don’t melt smoothly and can result in a thick or grainy ganache.
Tip: Always use high-quality white chocolate bars with cocoa butter listed in the ingredients. Brands like Ghirardelli or Lindt are great choices.
2. Overheating the Cream or Chocolate
White chocolate is much more delicate than dark or milk chocolate, and it scorches easily. Overheated cream can also cause it to seize or separate.
Tip: Gently heat cream until just simmering—not boiling—and pour it over finely chopped white chocolate. Let it sit undisturbed for 1–2 minutes before stirring to melt.
3. Applying Drip to a Warm Cake
Applying ganache to a cake that isn’t fully chilled is one of the most common drip issues. The heat from a room-temp cake can cause the drip to melt the frosting, run too far down the sides, or lose shape.
Tip: Chill your frosted cake in the fridge for at least 30 minutes before adding the drip to help it “set” on contact.
4. Making Ganache Too Runny or Too Thick
The perfect white chocolate ganache drip should flow smoothly but stop before pooling at the bottom. Too much cream will make it too thin, while too little will cause it to clump.
Tip: Use the ratio of 6 oz white chocolate to ½ cup cream. Let it cool slightly before applying—when it’s warm to the touch but no longer hot.
5. Skipping the Crumb Coat
Not crumb-coating your cake leads to a messy appearance, with visible cake crumbs trapped in the frosting. This also makes smoothing the outer layer more difficult.
Tip: Always apply a thin crumb coat and chill before adding your final layer of buttercream.
6. Uneven Cake Layers
Stacking lopsided layers makes decorating harder and creates a visually unbalanced result. If layers aren’t level, the ganache may run unevenly.
Tip: Use a cake leveler or serrated knife to trim domed tops from each layer before stacking.
7. Overfilling the Cake
Adding too much filling between layers can cause the cake to bulge or slide. This makes it harder to frost evenly and compromises stability.
Tip: Stick to about ½ cup of buttercream per layer and use a piping ring around the edge to keep fillings contained.
🧁 Tips and Tricks
Once you’ve mastered the basics of the White Chocolate Drip Cake, there are countless ways to elevate your results and simplify your process. These tried-and-true tips and professional tricks will help you work more efficiently while producing a cake that looks (and tastes) like it came from a high-end bakery.
1. Chill at Every Stage
This cake requires several stages of chilling to ensure the structure holds and each layer sets properly. Chilling the cake after crumb-coating, after final frosting, and before applying the drip is crucial for a polished finish.
Pro Tip: If you’re working in a warm kitchen or humid climate, pop your cake into the freezer for 10 minutes just before dripping.
2. Use a Turntable for Decorating
A cake turntable is one of the best investments you can make for even frosting, sharp edges, and precision when applying the drip.
Pro Tip: Combine it with an offset spatula and a bench scraper to get bakery-smooth sides.
3. Make Your Drip with a Squeeze Bottle
While a spoon or piping bag works fine, a small squeeze bottle gives you more control over each drip’s length and placement.
Pro Tip: Always test the ganache consistency on the inside of a bowl before applying to the actual cake.
4. Color the Ganache (Optional)
White chocolate ganache can be tinted using oil-based or powdered food coloring. This is perfect for holidays, themed birthdays, or seasonal cakes.
Warning: Avoid water-based coloring—it can cause the ganache to seize.
5. Flavor the Buttercream
Enhance the cake’s overall flavor with subtle additions to the buttercream, such as:
- A few drops of orange or raspberry extract
- A tablespoon of finely ground freeze-dried strawberries
- A teaspoon of lemon zest for freshness
6. Decorate Creatively
Top your cake with:
- White chocolate shards or curls
- Fresh berries or edible flowers
- Macarons or meringue kisses
- Sprinkles or gold leaf for a luxe finish
Pro Tip: Apply decorations right after the drip sets—while the frosting is still a bit tacky to help them stick.
7. Transport with Care
White Chocolate Drip Cakes are delicate and require safe transport.
Pro Tip: Chill the cake for at least an hour before moving it. Use a sturdy cake board and box that fits snugly to prevent shifting during travel.
Suggestions
While the classic White Chocolate Drip Cake is already a showstopper, the beauty of this dessert lies in how adaptable it is to different occasions, themes, and flavor preferences. Whether you’re baking for a birthday, holiday, or simply indulging in a weekend treat, these creative suggestions can help you tailor your cake to suit any celebration—or elevate it to new heights.
1. Make It Seasonal
Pair the white chocolate drip with seasonal fruits or decorations for a cake that reflects the time of year:
- Spring: Add edible flowers, pastel-colored buttercream, or a touch of lemon zest.
- Summer: Top with fresh berries, mango slices, or even a tropical twist using coconut flakes.
- Fall: Decorate with caramel drizzle, candied pecans, or pumpkin spice buttercream.
- Winter: Use peppermint candy shards, white sprinkles, or a dusting of powdered sugar “snow.”
2. Customize the Flavor Layers
Though vanilla or white cake is a classic base, you can easily change the sponge layers to suit different taste preferences:
- Chocolate sponge for a white-on-dark contrast.
- Almond or coconut cake for a nutty richness.
- Citrus layers (like orange or lemon) for brightness and balance.
Even marbled sponge (vanilla and chocolate) adds visual interest and depth of flavor without complicating the recipe.
3. Create Mini Cakes or Cupcakes
If you’re baking for a party or want single-serve desserts, this cake can be transformed into a batch of mini cakes or cupcakes. Use a cupcake pan and reduce the baking time accordingly. Pipe a swirl of buttercream on top and drizzle with white chocolate ganache for an elegant finish.
4. Add a Filling
Introduce texture and contrast with a simple filling between the layers. Here are some non-alcoholic, family-friendly ideas:
- Raspberry jam
- Whipped cream cheese and fruit puree
- Lemon curd
- Fresh strawberry slices folded into buttercream
Keep the filling light to maintain the balance and ensure the cake stays structurally sound.
5. Make It a Celebration Cake
With the right styling, this cake can easily become the centerpiece of any celebration. Use gold or silver sprinkles, piped rosettes, and letter toppers to spell out names or numbers. A white chocolate drip makes an excellent canvas for custom decorations that fit the theme of your party.
6. Try Flavor Variations in the Ganache
While the base ganache is white chocolate and cream, you can add a touch of flavor by infusing the cream with:
- Earl Grey or chamomile tea (strain before mixing)
- A small amount of orange or lemon zest
- A drop of food-grade vanilla or almond extract
Let the cream steep for 5–10 minutes, strain it, and then warm it up again before adding to the chocolate.
7. Use Alternative Frostings
Swiss meringue buttercream is elegant and smooth, but feel free to explore:
- American buttercream for a sweeter, denser texture
- Cream cheese frosting for a slight tang
- Whipped mascarpone for a light, airy finish
Just be sure whichever frosting you choose can hold up to the weight of the drip and decorations.
❓ FAQ
When it comes to baking a White Chocolate Drip Cake, especially if you’re new to the technique, questions are inevitable. Below are some of the most frequently asked questions—along with clear, detailed answers to help guide your cake to success.
Can I make this cake in advance?
Absolutely. In fact, making your cake a day ahead can improve flavor and texture. Bake the cake layers 1–2 days in advance and store them wrapped in plastic wrap at room temperature. Frost and drip on the day of serving or the night before, and refrigerate until ready to present.
Why is my ganache too runny or too thick?
If your ganache runs all the way down the cake or pools at the bottom, it may be too warm or too thin. If it won’t drip properly or looks chunky, it may be too cool or thick.
Solution: Use a ratio of 6 oz high-quality white chocolate to ½ cup heavy cream. Let it cool slightly before using. Test a few drips on the side of a chilled bowl first.
How do I get the ganache to drip evenly?
Start at the edge of a chilled cake using a spoon, piping bag, or squeeze bottle. Rotate the cake slowly on a turntable and work in sections. Use gentle pressure and consistent spacing between drips for symmetry.
Can I use a boxed cake mix?
Yes! While homemade cake is ideal, you can absolutely use a boxed mix for convenience. Choose vanilla, white, lemon, or even chocolate. Be sure to let the cake cool completely and frost it properly before adding the drip.
Is it okay to freeze this cake?
The cake layers freeze beautifully. Wrap each cooled layer tightly in plastic wrap, then foil. They can be frozen for up to 2 months. Thaw overnight in the fridge and bring to room temp before frosting. Fully frosted and dripped cakes can be stored in the fridge for up to 3 days.
What if I don’t have a turntable or squeeze bottle?
You can still make a beautiful drip cake without specialized tools. A spoon or zip-top bag with a small snip works fine for dripping ganache. A lazy Susan can substitute for a turntable. Smooth your frosting with an offset spatula and bench scraper.
How do I avoid air bubbles in the buttercream?
Beat the butter until pale and fluffy before adding sugar. Once the sugar is added, switch to low speed and stir slowly. This helps eliminate trapped air, giving your frosting a smooth, bubble-free finish.
Conclusion
The White Chocolate Drip Cake is a stunning dessert that perfectly balances elegance and indulgence. Whether you’re celebrating a special occasion, looking to impress guests, or simply treating yourself to something extraordinary, this cake delivers rich flavor and visual wow-factor with every bite. From mastering the silky, smooth white chocolate ganache to layering and decorating with finesse, the process is rewarding and approachable—even for home bakers.
By avoiding common mistakes such as using low-quality chocolate or applying ganache on a warm cake, and by following the tips and tricks shared here, you’ll be well on your way to baking a flawless cake that tastes as incredible as it looks. The versatility of this cake allows you to customize it with seasonal fruits, alternate flavor layers, or creative decorations, making it truly your own.
Remember, baking is as much about enjoying the journey as it is about the final product. Don’t hesitate to experiment, have fun, and share your delicious creation with family and friends. With practice and patience, your White Chocolate Drip Cake will become a signature dessert that everyone will love.
Happy baking!