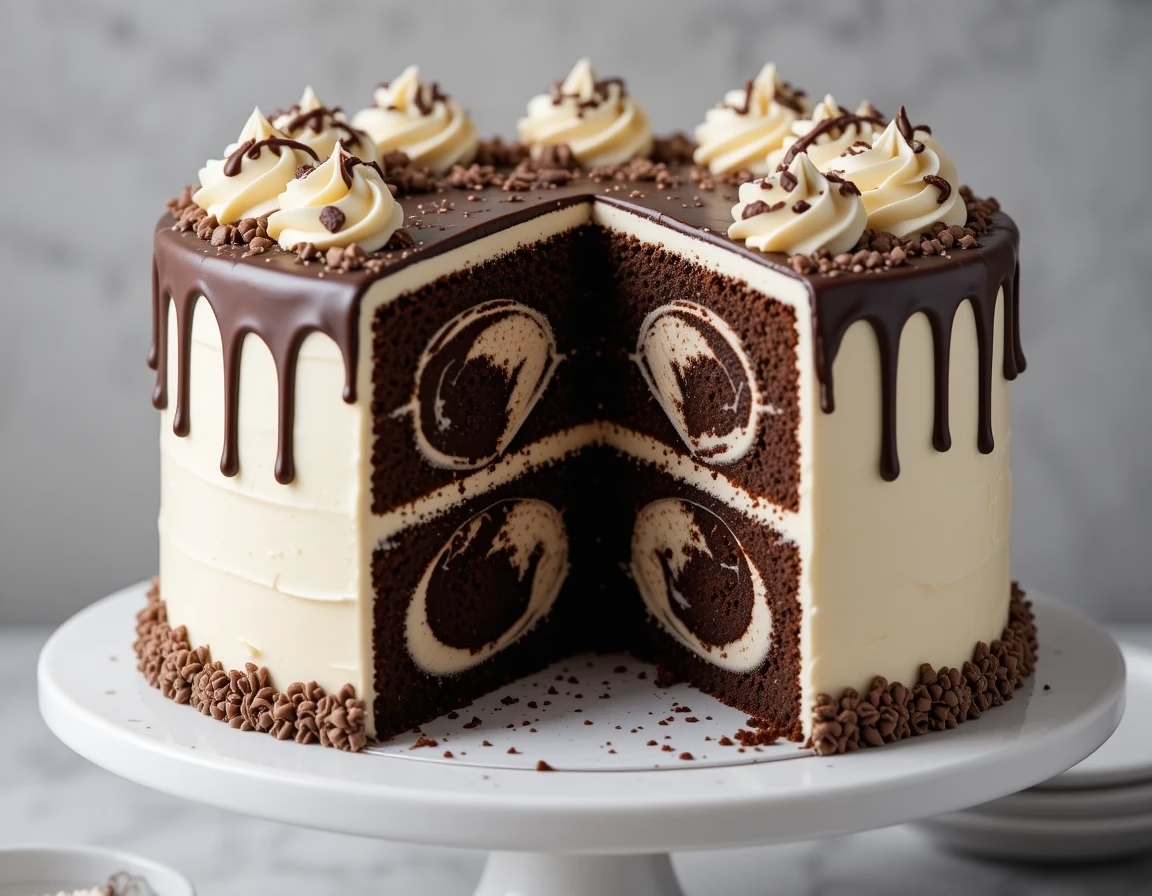
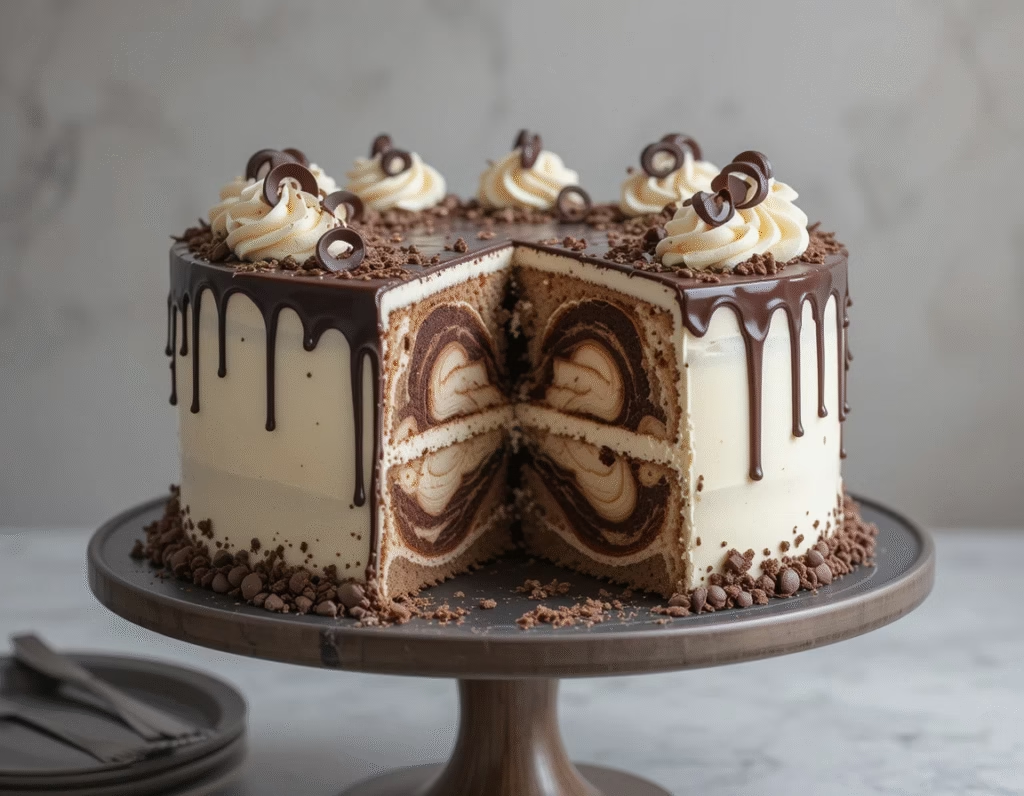
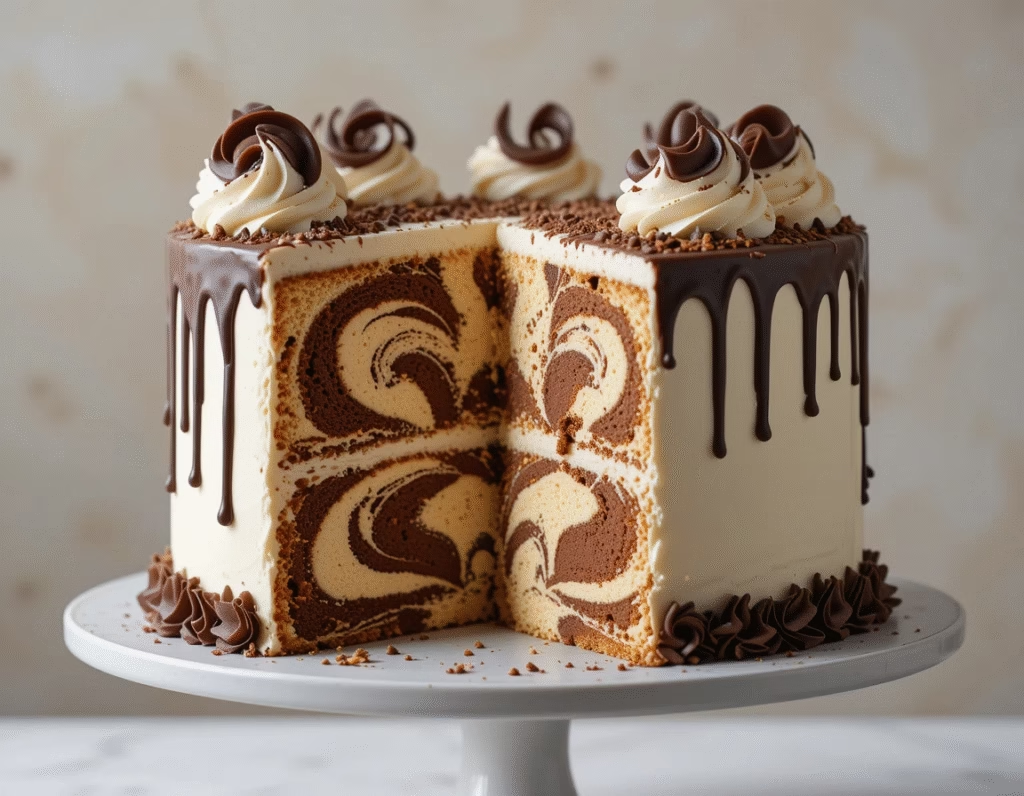
Best Marble Swirl Cake Recipe
If there’s one dessert that effortlessly bridges the gap between vanilla and chocolate lovers, it’s the Marble Swirl Cake. This classic cake offers the best of both worlds—a tender, moist crumb that dances between two iconic flavors. The Marble Swirl Cake is not only a visual delight with its stunning streaks of chocolate and vanilla, but also a versatile treat that works for birthdays, holidays, dinner parties, or cozy weekends at home.
The magic of the Marble Swirl Cake lies in its beautiful marbled pattern created by swirling two batters together. It looks intricate and fancy, but the beauty is that it’s quite simple to make with basic ingredients and a little creativity. Whether you’re a beginner baker or an experienced one looking to impress guests, the Marble Swirl Cake will become your go-to recipe for effortless elegance.
This cake has stood the test of time and remains a staple in American households, especially when you want something rich but not too indulgent. It’s light enough for brunch, sweet enough for dessert, and perfect with a cup of coffee or tea. The Marble Swirl Cake is also a nostalgic favorite—many of us remember it as the centerpiece of family gatherings or a welcome surprise in lunchboxes.
One of the reasons the Marble Swirl Cake continues to be so loved is its adaptability. Want to add a glaze? Go ahead. Need it dairy-free? That can be arranged. Craving a bit of crunch? Add some chopped nuts. The core structure of the Marble Swirl Cake is sturdy and forgiving, making it an excellent canvas for creativity.
And let’s not forget the sheer joy of slicing into a Marble Swirl Cake and seeing that perfect swirl pattern. It never fails to impress! Plus, it gives you an excuse to enjoy both chocolate and vanilla in one heavenly bite. If you’ve never tried baking this cake before, now’s the perfect time. And if you’ve had it before, get ready to fall in love with the Marble Swirl Cake all over again.
In this blog, we’ll dive into everything you need to know about baking the perfect Marble Swirl Cake, from essential ingredients to helpful storage tips and clever baking tricks. We’ll also troubleshoot common issues and share creative suggestions to make your version truly unique. Let’s get started on this swirl-tastic journey into the world of the Marble Swirl Cake!
What You’ll Need
Creating the perfect Marble Swirl Cake starts with having the right ingredients and tools on hand. While this cake isn’t complicated, using fresh, high-quality ingredients makes all the difference in the final flavor and texture. Below is everything you’ll need to prepare a show-stopping Marble Swirl Cake that’s moist, flavorful, and beautifully marbled.
Ingredients for the Marble Swirl Cake:
- 2 ½ cups (315g) all-purpose flour – This provides the structural base of the Marble Swirl Cake. Be sure to measure it correctly for the best results.
- 2 ½ tsp baking powder – This helps the Marble Swirl Cake rise and become fluffy.
- ½ tsp salt – A pinch of salt enhances the flavors in the Marble Swirl Cake, balancing sweetness and intensifying the chocolate and vanilla.
- 1 cup (226g) unsalted butter, softened – Butter brings richness and moisture to the Marble Swirl Cake. Make sure it’s softened so it creams well with sugar.
- 1 ¾ cups (350g) granulated sugar – Sweetness is key, and this amount ensures the Marble Swirl Cake is just right—never overly sweet.
- 4 large eggs, room temperature – Eggs help bind the ingredients and contribute to the tender crumb of the Marble Swirl Cake.
- 1 tbsp pure vanilla extract – This boosts the vanilla flavor in the light batter of the Marble Swirl Cake.
- 1 cup (240ml) whole milk, room temperature – Adds moisture and keeps the cake soft. Room temperature milk integrates better into the batter.
- ½ cup (43g) unsweetened cocoa powder – For the chocolate portion of the Marble Swirl Cake, choose a high-quality cocoa powder.
- ¼ cup (60ml) hot water – Mixing cocoa powder with hot water helps dissolve it smoothly and brings out its full chocolate flavor.
Optional Add-ins and Substitutions:
- Almond extract (½ tsp) – Adds a subtle depth to the vanilla portion of the Marble Swirl Cake.
- Espresso powder (½ tsp) – Enhances the chocolate flavor without making it taste like coffee. It’s optional but recommended for chocolate lovers.
- Dairy-free milk alternatives – Oat milk or almond milk can be used instead of whole milk if needed.
- Gluten-free flour blend – A 1:1 gluten-free blend can replace all-purpose flour if desired, but check for brand-specific tips.
Equipment You’ll Need:
- Stand mixer or hand mixer – Helps achieve a light, fluffy batter for your Marble Swirl Cake.
- Two mixing bowls – One for the main batter and one for mixing the cocoa swirl portion.
- Spatula – Essential for folding and swirling the two batters together.
- 9×5 inch loaf pan or 9-inch round cake pan – A loaf pan offers a dramatic vertical swirl, while a round pan gives you beautiful horizontal streaks in the Marble Swirl Cake.
- Toothpick or butter knife – Used to create the swirl pattern.
- Cooling rack – Keeps the Marble Swirl Cake from becoming soggy on the bottom after baking.
Having these ingredients and tools prepared before you begin will ensure a smooth and enjoyable baking experience. Once you have your setup ready, you’ll be able to focus on perfecting the swirl and baking a deliciously balanced Marble Swirl Cake. In the next section, we’ll guide you through each step of making your own beautifully marbled masterpiece.

Explore more classic cakes like our Elegant Coronation Victoria Sponge Cake.
How to Make (include full measurements)
Making a Marble Swirl Cake might seem intimidating due to its elegant, dual-flavored appearance, but it’s actually quite straightforward. The beauty of the Marble Swirl Cake lies in its simplicity and the satisfaction that comes with slicing into the final product to reveal a stunning swirl. Whether you’re baking this for a special occasion or just want something sweet and beautiful, this step-by-step guide ensures your Marble Swirl Cake turns out perfectly every time.
Step-by-Step Instructions for the Marble Swirl Cake
Ingredients:
- 2 ½ cups (315g) all-purpose flour
- 2 ½ tsp baking powder
- ½ tsp salt
- 1 cup (226g) unsalted butter, softened
- 1 ¾ cups (350g) granulated sugar
- 4 large eggs, room temperature
- 1 tbsp pure vanilla extract
- 1 cup (240ml) whole milk, room temperature
- ½ cup (43g) unsweetened cocoa powder
- ¼ cup (60ml) hot water
Instructions:
- Preheat your oven to 350°F (175°C). Grease and flour a 9×5-inch loaf pan or a 9-inch round cake pan. Set aside.
- Combine dry ingredients: In a medium mixing bowl, whisk together the flour, baking powder, and salt. This dry mix will form the foundation of your Marble Swirl Cake.
- Cream the butter and sugar: In a large mixing bowl, using a hand or stand mixer, cream together the butter and granulated sugar for 3–5 minutes until light and fluffy. This step is key for creating the tender crumb that makes the Marble Swirl Cake so moist.
- Add eggs one at a time: Beat in the eggs, one at a time, ensuring each egg is fully incorporated before adding the next. Stir in the vanilla extract.
- Alternate adding flour and milk: With the mixer on low speed, alternate adding the dry flour mixture and the milk in three additions, beginning and ending with the dry mixture. Mix until just combined. Be careful not to overmix, as this can affect the softness of your Marble Swirl Cake.
- Make the chocolate batter: In a small bowl, stir the cocoa powder and hot water together until smooth. Take 1 cup of the vanilla batter and mix it with the cocoa mixture to create your chocolate batter.
- Layer the batters: Pour half of the vanilla batter into the prepared pan, followed by half of the chocolate batter. Repeat the layers. Use a butter knife or skewer to swirl the batters gently together. Don’t overdo it—just a few swirls will create the signature marbled look of the Marble Swirl Cake.
- Bake for 50–60 minutes, or until a toothpick inserted into the center comes out clean. Ovens may vary, so start checking around the 50-minute mark.
- Cool and unmold: Allow the Marble Swirl Cake to cool in the pan for 10–15 minutes before transferring it to a wire rack to cool completely. Letting it cool properly helps set the structure and enhances the flavor.
By following these simple steps, you’ll end up with a delicious Marble Swirl Cake that’s soft, moist, and full of character. The light vanilla batter and rich cocoa batter create a beautiful balance of flavor that’s sure to please any crowd. Once cooled, you can serve the cake as is or dress it up with a dusting of powdered sugar or a drizzle of chocolate ganache. Either way, your homemade Marble Swirl Cake is sure to be a hit.
Serving and Storage Tips
The Marble Swirl Cake is more than just a visual treat—it’s an experience to be savored. When served properly, its balanced flavors and soft, buttery crumb can steal the show at any gathering. Knowing how to serve it for the best experience and store it to maintain its freshness ensures that every slice of your Marble Swirl Cake is just as enjoyable as the first.
Serving the Marble Swirl Cake
Best Serving Temperature:
The Marble Swirl Cake tastes best at room temperature. If stored in the fridge, allow it to sit out for 20–30 minutes before serving. This helps the butter in the cake soften slightly, restoring its tender texture and making the flavors pop.
Cutting for Clean Swirls:
To show off the elegant marbling, use a sharp, serrated knife. Wipe the blade clean between slices to avoid smearing chocolate into the vanilla portions. Clean cuts enhance the presentation of the Marble Swirl Cake, especially if you’re serving it to guests.
Pairings:
The Marble Swirl Cake is versatile and pairs well with many sides:
- A dollop of whipped cream or a scoop of vanilla ice cream.
- Fresh berries like strawberries, raspberries, or blueberries.
- A dusting of powdered sugar or a light glaze made from powdered sugar and milk.
- A drizzle of chocolate or caramel sauce for extra indulgence.
You can also serve the Marble Swirl Cake as part of a dessert platter or afternoon tea spread, where its unique appearance and dual flavors make it a standout choice.
Storage Tips for the Marble Swirl Cake
At Room Temperature:
If you plan to eat the Marble Swirl Cake within 2–3 days, store it in an airtight container at room temperature. Keep it away from direct sunlight or heat sources. The cake’s moisture content allows it to stay fresh and soft for several days without refrigeration.
In the Refrigerator:
For longer storage (up to 5–6 days), you can refrigerate the Marble Swirl Cake. Wrap it in plastic wrap or place it in an airtight container to prevent drying out. Before serving, let the cake come back to room temperature to restore its soft texture.
Freezing for Later Use:
The Marble Swirl Cake freezes beautifully. Here’s how:
- Cool the cake completely.
- Wrap it tightly in plastic wrap, then a layer of aluminum foil.
- Label and freeze for up to 2–3 months.
When ready to enjoy, thaw the Marble Swirl Cake overnight in the refrigerator or for a few hours at room temperature. If you’re freezing slices, separate them with parchment paper so you can thaw individual portions as needed.
Avoiding Moisture Loss:
To maintain that just-baked taste, always seal the Marble Swirl Cake well when storing. Moisture loss is the biggest enemy of cake freshness. Using airtight containers, plastic wrap, or even a cake dome can help preserve the cake’s texture and flavor.
Whether you’re serving it to guests or savoring it over several days, following these serving and storage tips will ensure that your Marble Swirl Cake remains as delicious and visually striking as the day you baked it.
Mistakes to Avoid
While the Marble Swirl Cake may seem like a foolproof recipe, a few missteps can impact both its texture and appearance. Understanding what not to do is just as crucial as following the correct steps. Whether you’re baking the Marble Swirl Cake for the first time or the fiftieth, avoiding these common mistakes will ensure that your cake turns out perfect every single time.
1. Overmixing the Batter
One of the biggest mistakes you can make when preparing the Marble Swirl Cake is overmixing the batter. Once you add the dry ingredients to the wet mixture, you want to mix just until everything is combined. Overmixing activates the gluten in the flour, which can result in a dense, tough cake rather than the soft, tender crumb that defines a good Marble Swirl Cake.
2. Using Cold Ingredients
Another frequent error is using cold ingredients straight from the fridge. Cold butter doesn’t cream properly, cold eggs don’t emulsify well, and cold milk can cause the batter to curdle. Make sure all your ingredients—especially butter, eggs, and milk—are at room temperature before beginning your Marble Swirl Cake.
3. Failing to Swirl Correctly
Getting that beautiful marbled effect requires a gentle hand. A common mistake is over-swelling the two batters, which blends them too much and ruins the visual contrast. You only need a few swirls with a butter knife or skewer to achieve the perfect Marble Swirl Cake pattern. Resist the urge to overdo it!
4. Uneven Layering
Improperly layering the vanilla and chocolate batters can lead to uneven distribution of flavors. It’s important to add equal amounts of each batter to create consistent marbling. Don’t just pour all the vanilla and then all the chocolate. Alternate scoops and layer in batches so your Marble Swirl Cake has a balanced flavor throughout.
5. Baking at the Wrong Temperature
Always preheat your oven and use an oven thermometer if possible. If the oven is too hot, the outside of the Marble Swirl Cake may brown too quickly while the inside remains undercooked. Too cool, and the cake might dry out before it’s fully baked. Stick with 350°F (175°C) for the best results.
6. Removing the Cake Too Early from the Pan
Let the Marble Swirl Cake cool in the pan for at least 10–15 minutes before transferring it to a cooling rack. Removing it too soon can cause it to break apart. Conversely, leaving it in the pan too long can create a soggy bottom due to trapped steam.
7. Incorrect Pan Size
Using the wrong pan size can drastically affect the bake time and structure of your Marble Swirl Cake. A pan that’s too small will cause the cake to overflow, while a pan that’s too large will leave you with a thin, dry result. Stick with a 9×5-inch loaf pan or a 9-inch round pan as suggested.
By keeping these common pitfalls in mind, you’ll dramatically increase your chances of baking a flawless Marble Swirl Cake. Mastering the technique comes with practice, and each bake brings you one step closer to perfection.
Tips and Tricks
Mastering the Marble Swirl Cake is about more than just avoiding mistakes—it’s also about knowing those small, clever enhancements that elevate your bake from good to unforgettable. These expert-level tips and tricks will help you get the most flavor, the best texture, and the most impressive presentation out of your Marble Swirl Cake.
1. Use High-Quality Cocoa and Vanilla
The two main flavor profiles in a Marble Swirl Cake are chocolate and vanilla, so it makes sense to use the best you can find. Choose pure vanilla extract and a rich, unsweetened cocoa powder. The better your base ingredients, the more flavorful your final Marble Swirl Cake will be.
2. Warm the Cocoa Batter Slightly
Before swirling, warm the chocolate portion of the batter just a touch—5 to 10 seconds in the microwave is enough. This loosens the batter and allows it to swirl more easily through the vanilla portion, creating cleaner and more defined lines in your Marble Swirl Cake.
3. Swirl Strategically
A common swirl pattern involves dragging a knife in an “S” motion across the batter after layering. You can also swirl in circular motions or zigzags depending on how you want the marbling to appear. No two Marble Swirl Cakes look alike, and that’s part of their charm!
4. Add a Glaze or Topping
Although the Marble Swirl Cake is delicious on its own, you can take it to the next level with a simple glaze. A quick icing made from powdered sugar and milk (or orange juice for a citrus twist) poured over the cooled cake adds sweetness and shine. Alternatively, a light chocolate ganache drizzle complements the dual flavors of the Marble Swirl Cake beautifully.
5. Infuse Extra Flavor
Try adding a teaspoon of espresso powder to the chocolate batter for deeper cocoa notes without making the Marble Swirl Cake taste like coffee. Or add citrus zest—like lemon or orange—to the vanilla batter for a fresh twist. These little touches make the cake feel more gourmet.
6. Use Room Temperature Tools
Just like ingredients, your tools (such as mixing bowls and beaters) perform better when they’re not ice cold. If your butter starts to stiffen because it touches a cold bowl, it won’t cream properly, and that can alter the final texture of the Marble Swirl Cake.
7. Make Mini Marble Swirl Cakes
Want individual portions? Bake the same batter in a muffin tin lined with cupcake wrappers. You’ll get adorable mini Marble Swirl Cakes that are perfect for parties or gifting. Just reduce the baking time to 18–22 minutes and check with a toothpick.
8. Rest Before Cutting
After cooling, let the Marble Swirl Cake rest for another 30 minutes before slicing. This helps all the internal moisture settle evenly and results in clean slices that don’t crumble.
By incorporating these tips and tricks, you’ll not only improve your baking skills but also create a Marble Swirl Cake that impresses everyone lucky enough to try it. The swirl might look fancy, but with a few thoughtful tweaks and pro techniques, you’ll find it’s easier than ever to make a truly exceptional Marble Swirl Cake.
Suggestions
The beauty of the Marble Swirl Cake lies not just in its elegant appearance but in how versatile it is for various occasions, preferences, and personal touches. While the classic chocolate and vanilla swirl is a timeless crowd-pleaser, there’s plenty of room to get creative. Whether you’re baking for a birthday party, adapting it for dietary needs, or simply trying to make the Marble Swirl Cake your own, the possibilities are truly endless.
1. Flavor Variations
While chocolate and vanilla are a winning combination, don’t hesitate to try new flavor pairings in your Marble Swirl Cake. For example:
- Lemon and Blueberry Swirl Cake: Replace the cocoa portion with a blueberry puree and flavor the vanilla batter with fresh lemon zest.
- Pumpkin Spice Marble Swirl Cake: During the fall, swap the chocolate swirl with pumpkin puree and warm spices like cinnamon, nutmeg, and ginger.
- Mocha Marble Swirl Cake: Enhance the chocolate portion with instant coffee or espresso powder for a bold mocha twist.
These creative spins offer fun new ways to enjoy the Marble Swirl Cake while still maintaining the iconic swirl.
2. Add Texture
If you enjoy a bit of crunch, consider incorporating texture into your Marble Swirl Cake:
- Chopped nuts like walnuts, pecans, or almonds can be folded into the batter or sprinkled on top.
- Mini chocolate chips or white chocolate chunks in the chocolate portion create delicious surprise bites.
- Toasted coconut flakes can be added to the top before baking or mixed into the vanilla batter for extra dimension.
Texture upgrades can elevate the eating experience without changing the heart of what makes the Marble Swirl Cake so special.
3. Frosting or Glaze Ideas
Although the Marble Swirl Cake is delightful on its own, adding a topping can take it to the next level for more formal occasions. Consider:
- A vanilla bean glaze made from powdered sugar, vanilla bean paste, and milk.
- A chocolate ganache drizzle for extra richness.
- A citrus glaze using orange or lemon juice for a tart contrast to the sweet cake base.
These additions can enhance both the visual appeal and flavor of your Marble Swirl Cake, especially when served at special events.
4. Holiday and Seasonal Touches
The Marble Swirl Cake can be tailored to fit various holidays and seasons:
- Christmas: Add peppermint extract to the chocolate swirl and top with crushed candy canes.
- Valentine’s Day: Add red or pink food coloring to the vanilla portion and shape the swirls into subtle heart patterns.
- Fourth of July: Add red and blue streaks into the vanilla batter and top with patriotic sprinkles.
Simple seasonal enhancements can help your Marble Swirl Cake feel festive and theme-appropriate without altering the core recipe too much.
5. Serving Ideas for Different Occasions
- Tea Time or Brunch: Serve plain or with a light glaze alongside fresh berries and whipped cream.
- Birthday Celebrations: Add a layer of buttercream frosting and top with colorful sprinkles.
- Gifting: Bake mini Marble Swirl Cakes in small loaf pans, wrap them in cellophane, and tie with a ribbon.
No matter the event, the Marble Swirl Cake can be dressed up or down and still be the star of the show.
These creative suggestions make it clear that the Marble Swirl Cake isn’t just a recipe—it’s a canvas for flavor, style, and celebration. Feel free to make it your own while appreciating the classic structure that makes the Marble Swirl Cake a beloved favorite.
FAQ
When it comes to baking the perfect Marble Swirl Cake, home bakers often have questions about technique, ingredients, and storage. Below, we’ve compiled a list of the most frequently asked questions to help you master the Marble Swirl Cake with confidence.
1. Can I make a Marble Swirl Cake without eggs?
Yes, the Marble Swirl Cake can be adapted for egg-free diets. Replace each egg with a suitable alternative like:
- ¼ cup unsweetened applesauce
- ¼ cup plain yogurt or Greek yogurt
- 1 tablespoon ground flaxseed mixed with 3 tablespoons water (let it sit for 10 minutes)
These substitutes help retain the moistness and structure of the Marble Swirl Cake without compromising flavor.
2. Can I make it gluten-free?
Absolutely. Replace the all-purpose flour with a 1:1 gluten-free baking blend. Look for a brand that contains xanthan gum for the best texture. Keep in mind that gluten-free versions of the Marble Swirl Cake may be slightly more delicate, so allow extra cooling time before slicing.
3. Can I use oil instead of butter?
You can substitute butter with oil in the Marble Swirl Cake for a slightly different texture. Use ¾ cup of a neutral oil like canola or sunflower instead of 1 cup of butter. The result will be a slightly denser, very moist cake, though it will lack the rich flavor that butter provides.
4. How do I store leftover Marble Swirl Cake?
Store your Marble Swirl Cake at room temperature in an airtight container for up to 3 days. For longer storage, refrigerate for 5–6 days, or freeze for up to 3 months. Always bring it back to room temperature before serving for best texture and flavor.
5. What’s the best way to swirl the batters?
Use a butter knife or skewer. After layering the vanilla and chocolate batters, gently drag the knife through in an “S” or spiral pattern. Don’t overmix, or you’ll lose the contrast that defines a good Marble Swirl Cake.
6. Can I make a Marble Swirl Cake in advance?
Yes! The Marble Swirl Cake can be made a day ahead and stored, covered, at room temperature. In fact, some bakers find the flavor improves slightly after resting overnight. If preparing for an event, baking in advance is a great way to save time without sacrificing quality.
7. What’s the best pan to use?
A standard 9×5-inch loaf pan or a 9-inch round cake pan works best for the Marble Swirl Cake. Both allow the swirls to form beautifully and the cake to bake evenly. Make sure to grease and flour the pan well to ensure easy release.
8. Why did my cake sink in the middle?
A sunken Marble Swirl Cake could be the result of underbaking, too much leavening, or opening the oven door too early. Always check doneness with a toothpick and avoid peeking until at least 45 minutes into the bake.
This FAQ section is designed to eliminate the guesswork and help you enjoy every step of making the Marble Swirl Cake. Whether you’re baking for fun or for a crowd, a little extra knowledge goes a long way toward success.
Conclusion
There’s something timeless and comforting about the Marble Swirl Cake. It combines two classic flavors—vanilla and chocolate—into one beautiful, satisfying dessert that feels both familiar and impressive. Whether you’re baking it for a special occasion or simply because you’re craving something sweet and homemade, the Marble Swirl Cake offers the perfect solution.
Throughout this guide, we’ve covered every aspect of the Marble Swirl Cake, from gathering your ingredients to nailing the perfect swirl. We explored the essential tools, highlighted common mistakes to avoid, and shared expert-level tips and creative suggestions to make your version of the Marble Swirl Cake truly one-of-a-kind. Even if you’re new to baking, this cake is an ideal starting point: simple, adaptable, and always rewarding.
The beauty of the Marble Swirl Cake isn’t just in how it looks or tastes—it’s in the way it brings people together. It’s a cake that sparks joy at birthday parties, afternoon teas, family dinners, and holiday celebrations. Its soft crumb and bold contrast of flavors make each bite feel special. And yet, the process of making the Marble Swirl Cake is so approachable that you’ll find yourself coming back to it again and again.
One of the greatest strengths of the Marble Swirl Cake is its versatility. It can be dressed up with glazes and toppings or served plain with coffee or tea. It freezes well, makes a wonderful gift, and adapts easily to different dietary preferences. No matter how you slice it—literally or figuratively—the Marble Swirl Cake is a dessert that fits just about any occasion.
So if you’ve been hesitant to try it, let this be your sign. The Marble Swirl Cake is calling your name. Get your ingredients ready, preheat your oven, and enjoy the process of creating something that’s both beautiful and delicious. Baking is a joy—and few recipes deliver that joy more reliably than the humble yet glorious Marble Swirl Cake.
Thank you for joining us on this flavorful journey. We hope you fall in love with baking (or fall in love with it all over again) one swirl at a time. And remember: every time you bake a Marble Swirl Cake, you’re not just making a dessert—you’re making a memory.