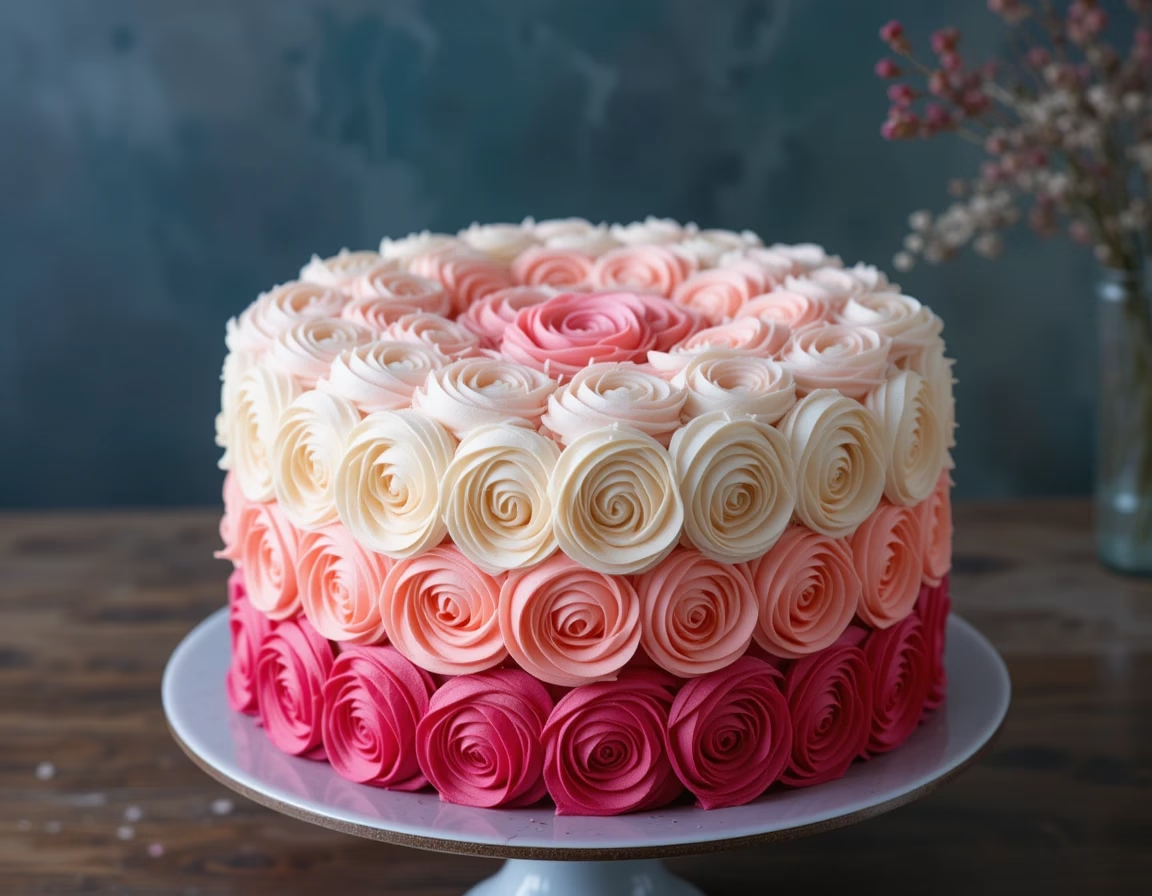
Best Ombre Rosette Cake
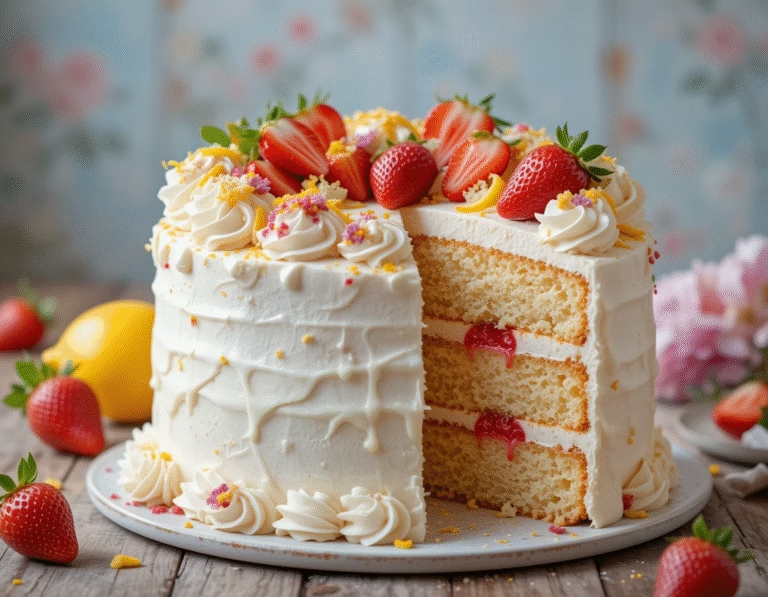
If you’re searching for a show-stopping dessert that looks as good as it tastes, an Ombre Rosette Cake is the perfect centerpiece for your next celebration. This stunning cake features layers of soft, moist sponge tinted in gradually deepening shades of your chosen color, crowned with a breathtaking rosette buttercream design that fades from light to dark. Whether you’re celebrating a birthday, bridal shower, baby shower, or simply want to practice your piping skills, an Ombre Rosette Cake will leave everyone speechless the moment it’s brought to the table.
What makes an Ombre Rosette Cake so special is that it’s more than just a cake — it’s an edible work of art. The ombre effect is eye-catching yet surprisingly achievable for home bakers, even if you’re new to decorating. The piped buttercream rosettes are created using a simple star tip and a steady hand, giving you full creative freedom to customize the color palette to match your event’s theme or your favorite shades.
Beyond its beautiful appearance, the Ombre Rosette Cake is incredibly delicious. Each layer is fluffy, tender, and pairs perfectly with the smooth, creamy buttercream that covers it. The classic vanilla sponge is lightly sweet and acts as the ideal canvas for bold or pastel colors alike. When guests slice into your Ombre Rosette Cake, they’ll be wowed by the gradient inside and the elegant rosettes outside.
In this blog, you’ll learn exactly how to create your own Ombre Rosette Cake from scratch, even if you’ve never piped a rosette before. I’ll walk you through the ingredients you’ll need, step-by-step instructions, helpful serving and storage tips, and all the tricks you need to avoid common decorating pitfalls. You’ll also get creative suggestions for customizing your Ombre Rosette Cake, answers to frequently asked questions, and a concluding pep talk to help you show off your baking masterpiece.
Once you master this Ombre Rosette Cake, you’ll have a go-to recipe that makes any gathering feel extra special. Get ready to impress your guests, snap envy-worthy photos, and enjoy every sweet bite of your homemade edible artwork!
What You’ll Need
Before you begin baking your Ombre Rosette Cake, it’s important to gather all your ingredients and tools. Being organized sets you up for success and makes decorating far less stressful, especially when you’re working with multiple colors of batter and buttercream.
Ingredients for the Vanilla Cake Layers:
- 3 cups all-purpose flour
- 2 ½ teaspoons baking powder
- ½ teaspoon baking soda
- ½ teaspoon salt
- 1 cup unsalted butter, softened
- 2 cups granulated sugar
- 4 large eggs, at room temperature
- 1 tablespoon pure vanilla extract
- 1 ½ cups buttermilk, at room temperature
- Gel food coloring in your chosen ombre shades (for example: three to four shades of pink, purple, or blue)
Ingredients for the Buttercream Frosting:
- 2 cups unsalted butter, softened
- 6–7 cups powdered sugar, sifted
- 2–4 tablespoons heavy cream or whole milk
- 2 teaspoons pure vanilla extract
- Pinch of salt
- Gel food coloring in the same shades as your cake layers for a perfect ombre match
Essential Tools:
- Three or four 8-inch round cake pans (depending on how many ombre layers you want)
- Parchment paper for lining pans
- Electric mixer (stand mixer or hand mixer)
- Mixing bowls
- Offset spatula for frosting
- Piping bags
- Large open star piping tip (such as Wilton 1M)
- Cake turntable (optional, but highly recommended for smooth decorating)
- Cake leveler or long serrated knife for even layers
Having the right tools makes decorating an Ombre Rosette Cake so much easier. A turntable helps you frost smoothly and pipe rosettes evenly around the sides and top. Gel food coloring is a must — liquid food coloring can thin your batter and buttercream, making your colors less vibrant and harder to pipe.
Before you begin mixing, make sure your butter and eggs are at room temperature, and prepare your cake pans by greasing and lining them with parchment circles. With your ingredients and tools ready, you’re all set to create your beautiful Ombre Rosette Cake!
Try our Fresh Raspberry Vanilla Mousse for a light, fruity dessert idea!
How to Make (Include Full Measurements)
Now that you have everything ready, it’s time to bring your Ombre Rosette Cake to life! Baking this cake is a step-by-step process that combines simple baking skills with fun decorating techniques. Take your time and enjoy the process — you’re about to create a masterpiece.
1. Preheat and Prepare
Preheat your oven to 350°F (175°C). Grease three or four 8-inch round cake pans and line the bottoms with parchment paper for easy release. This step is crucial to ensure your Ombre Rosette Cake layers come out clean and intact.
2. Mix Dry Ingredients
In a medium bowl, whisk together 3 cups all-purpose flour, 2 ½ teaspoons baking powder, ½ teaspoon baking soda, and ½ teaspoon salt. Set aside.
3. Cream Butter and Sugar
In a large mixing bowl, use an electric mixer to cream together 1 cup unsalted butter (softened) and 2 cups granulated sugar until light and fluffy — about 3–5 minutes on medium speed. This step gives your Ombre Rosette Cake its soft, airy crumb.
4. Add Eggs and Vanilla
Beat in 4 large eggs, one at a time, mixing well after each addition. Add 1 tablespoon pure vanilla extract and mix until combined.
5. Combine Wet and Dry
With the mixer on low, add the dry ingredients to the butter mixture in three parts, alternating with 1 ½ cups buttermilk. Start and end with the dry mix. Mix just until combined — don’t overmix or your Ombre Rosette Cake layers could turn out dense.
6. Color the Batter
Divide the batter evenly into three or four bowls, depending on how many layers you want. Add gel food coloring to each bowl to create your gradient. Start with the lightest shade and deepen the color gradually for each additional bowl.
7. Bake the Layers
Pour each colored batter into its prepared pan. Bake for 22–25 minutes, or until a toothpick inserted in the center comes out clean. Allow the cakes to cool in the pans for 10 minutes, then turn them out onto a wire rack to cool completely.
8. Make the Buttercream
In a clean bowl, beat 2 cups unsalted butter until creamy (about 5 minutes). Gradually add 6–7 cups sifted powdered sugar, 2 teaspoons pure vanilla extract, and a pinch of salt. Add 2–4 tablespoons heavy cream or whole milk as needed until the buttercream is smooth and spreadable.
9. Frost and Create Rosettes
Once the cakes are completely cool, level the tops if needed. Stack your layers from darkest to lightest, spreading a thin layer of buttercream between each layer. Apply a crumb coat to the entire Ombre Rosette Cake and chill for 15–20 minutes.
Divide the remaining buttercream into three or four bowls and tint them to match your cake layers. Fill piping bags fitted with a large star tip with each color.
Pipe rosettes starting from the bottom with the darkest shade, working your way up and around with the lighter shades. Continue until the entire Ombre Rosette Cake is covered in beautiful ombre rosettes!
Serving and Storage Tips
After you’ve put so much love and effort into baking and decorating your Ombre Rosette Cake, you’ll want to make sure it stays as fresh and beautiful as possible for serving. Here’s how to serve and store your cake so it tastes amazing and looks stunning.
Serving Tips:
For clean, picture-perfect slices, use a sharp serrated knife dipped in hot water and wiped dry between cuts. This helps the knife glide through the buttercream rosettes without smearing them. Serve the Ombre Rosette Cake at room temperature so the buttercream is creamy and the cake layers are soft and flavorful.
An Ombre Rosette Cake makes a gorgeous centerpiece for parties, showers, birthdays, or weddings. Pair each slice with coffee, tea, or sparkling water for a refreshing complement to the sweet, rich flavors.
Storage Tips:
If you have leftover Ombre Rosette Cake, store it in an airtight cake container or gently cover it with plastic wrap. The cake will keep well at room temperature for up to 2 days. If your home is warm or humid, it’s better to refrigerate the cake to keep the buttercream stable.
When refrigerating, cover the cake well to prevent it from absorbing fridge odors or drying out. Before serving, let your Ombre Rosette Cake come back to room temperature for the best taste and texture — about 30–60 minutes is ideal.
If you’d like to make your Ombre Rosette Cake ahead of time, bake the cake layers in advance. Wrap cooled, unfrosted layers tightly in plastic wrap and freeze them for up to one month. Thaw the layers in the refrigerator overnight, then frost and decorate when you’re ready.
Avoid storing the Ombre Rosette Cake near strong-smelling foods in the fridge. Keep the colors vibrant by storing it in a cake box or covered dome. If transporting your cake, keep it chilled before travel and transport it on a flat surface to maintain those beautiful rosettes.
Following these serving and storage tips ensures your Ombre Rosette Cake stays delicious, fresh, and visually stunning from the first slice to the very last bite.
Mistakes to Avoid
Creating an Ombre Rosette Cake is a fun and rewarding project, but it’s easy to run into a few common mistakes along the way. Knowing what to watch out for can save you time, frustration, and help ensure your cake turns out as stunning as you imagined.
1. Skipping the crumb coat:
One of the biggest mistakes bakers make when decorating an Ombre Rosette Cake is skipping the crumb coat. This thin layer of frosting locks in stray crumbs and provides a smooth base for your final rosettes. If you skip it, you risk having crumbs in your beautiful buttercream swirls.
2. Uneven cake layers:
If your cake layers are uneven, your Ombre Rosette Cake may tilt or look lopsided. Always level your cakes with a serrated knife or cake leveler before stacking. Even layers make the final result look clean and professional.
3. Using liquid food coloring:
Liquid food coloring can water down your cake batter or buttercream, leading to dull colors and a runny consistency. Always use high-quality gel food coloring for vibrant, consistent shades in your Ombre Rosette Cake.
4. Overmixing the batter:
Overmixing your cake batter can result in a dense, dry cake. Once you combine the wet and dry ingredients, mix just until there are no streaks of flour. This keeps your Ombre Rosette Cake layers light and tender.
5. Frosting a warm cake:
Never frost warm cake layers. The heat will melt your buttercream and ruin the rosettes. Make sure your Ombre Rosette Cake layers are completely cool before you crumb coat or pipe rosettes.
6. Using the wrong piping tip:
A rosette design relies on the right piping tip. Using a tip that’s too small won’t give you the classic swirl. A large open star tip, like a Wilton 1M, is perfect for piping bold, beautiful rosettes on your Ombre Rosette Cake.
7. Not practicing piping:
If you’ve never piped rosettes before, practice on parchment paper first. Once you’re comfortable, move on to your cake. This small step can help your Ombre Rosette Cake look like a professional bakery creation.
By avoiding these common mistakes, you’ll feel more confident and have a smoother decorating experience. A little patience and preparation go a long way toward making your Ombre Rosette Cake a true showstopper.
Tips and Tricks
Bringing your Ombre Rosette Cake to life isn’t just about avoiding mistakes — it’s also about using smart tricks to make decorating easier and your final cake even more impressive. Here are my best tried-and-true tips for success.
1. Chill your cake layers:
Cold cake layers are easier to stack, level, and frost. Once baked and cooled to room temperature, chill your Ombre Rosette Cake layers in the fridge for 30 minutes before stacking and frosting. This makes the cake sturdier and minimizes crumbs.
2. Use a turntable:
A cake turntable is a game changer for smooth decorating. It allows you to spin your Ombre Rosette Cake as you frost, ensuring even application and perfectly spaced rosettes.
3. Keep a clean edge:
After applying the crumb coat, run an offset spatula around the sides for a smooth finish. This gives your rosettes a clean base to stick to and makes the finished Ombre Rosette Cake look polished.
4. Practice piping pressure:
Even pressure while piping is key to uniform rosettes. If you’re new to piping, practice your swirl motion and pressure on parchment paper until you’re confident.
5. Use separate piping bags:
For crisp ombre layers, use separate piping bags for each color. Fill each bag with its tinted buttercream, then pipe one color at a time, working from the bottom up for that stunning fade effect.
6. Keep your buttercream the right consistency:
If your buttercream is too stiff, it won’t pipe smoothly; if it’s too soft, your rosettes will droop. Adjust by adding a spoonful of milk (to loosen) or extra powdered sugar (to stiffen) until you reach the perfect texture for your Ombre Rosette Cake.
7. Wipe your piping tip:
If you notice buttercream buildup on your piping tip, wipe it off between colors. This helps each rosette stay crisp and defined, making your Ombre Rosette Cake look flawless.
8. Have fun with colors:
Don’t be afraid to play with shades! Your Ombre Rosette Cake can be subtle pastels, bold jewel tones, or any color combination that fits your theme.
With these tips and tricks, you’ll feel ready to decorate your Ombre Rosette Cake with confidence. Take your time, enjoy the process, and remember: practice makes perfect!
Suggestions
One of the best things about making an Ombre Rosette Cake is that once you master the technique, the creative possibilities are endless. Whether you’re baking for a birthday, baby shower, bridal brunch, or just because, there are countless ways to personalize this stunning cake and make it truly your own.
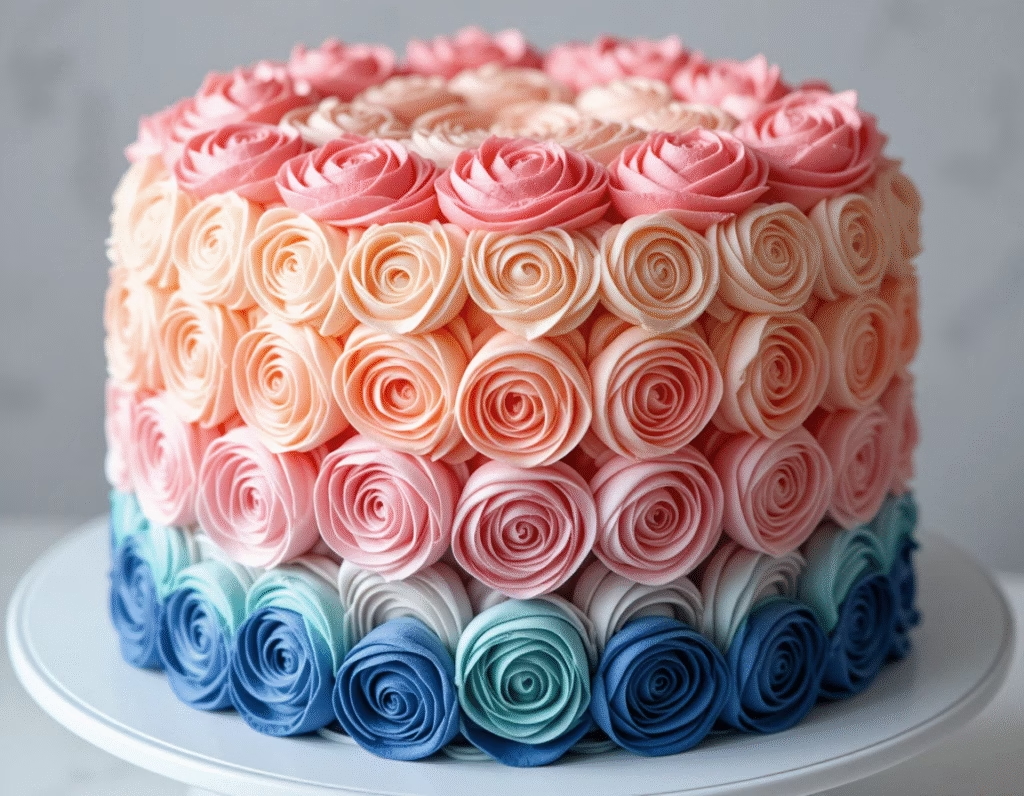
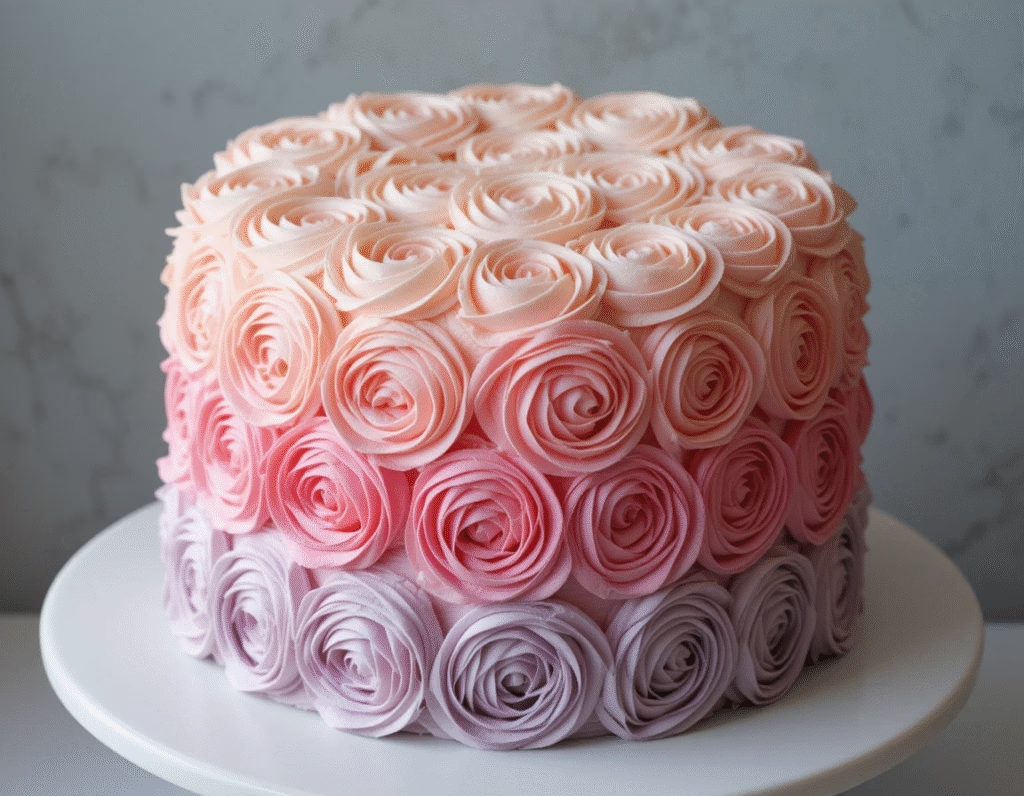
Try different colors:
An Ombre Rosette Cake doesn’t have to be pink! Experiment with shades of blue for a boy’s baby shower, soft lavender and purple for a spring event, or bold red tones for a Valentine’s Day surprise. You can even create a rainbow ombre effect by stacking more layers in multiple colors.
Change up the flavors:
The classic vanilla base for your Ombre Rosette Cake is perfect for letting the colors pop, but you can easily switch things up. Try a subtle almond or lemon extract for a fresh twist. Or add a hint of cocoa powder for a light chocolate cake that still shows off the ombre layers beautifully.
Add edible decorations:
While the rosettes alone are stunning, you can elevate your Ombre Rosette Cake even more by adding edible pearls, gold leaf, or tiny sugar flowers in complementary shades. These simple extras make your cake look like it came straight from a professional bakery.
Fill between layers:
For extra indulgence, add a layer of flavored filling between each cake tier. Raspberry jam, lemon curd, or even a thin spread of Nutella can make your Ombre Rosette Cake extra decadent without taking away from the beautiful rosette exterior.
Make cupcakes too:
If you want to offer guests individual treats, use leftover batter to bake matching ombre rosette cupcakes. Pipe a single rosette on top of each cupcake for a sweet mini version of your Ombre Rosette Cake.
Adapt for different sizes:
Not every gathering calls for a full three or four-layer cake. You can halve the recipe to make a smaller 6-inch Ombre Rosette Cake, perfect for more intimate celebrations.
Coordinate your setup:
When serving an Ombre Rosette Cake, think about your presentation. Use a cake stand that complements your color theme. Add fresh flowers or color-coordinated napkins to complete your party table.
These suggestions prove there’s no limit to how you can customize an Ombre Rosette Cake. Whether you stick to classic pink or experiment with unexpected hues and flavors, your cake will always be a stunning centerpiece that leaves guests amazed.

FAQ
Over the years, I’ve received many questions about baking and decorating an Ombre Rosette Cake. Here are the most common FAQs to help you bake with confidence and avoid last-minute surprises.
Can I make an Ombre Rosette Cake ahead of time?
Absolutely! Bake your cake layers a day or two in advance, wrap them tightly in plastic wrap, and store them in the refrigerator. For longer storage, freeze unfrosted layers for up to a month. Assemble and frost your Ombre Rosette Cake the day you plan to serve for the freshest flavor.
How do I get vibrant colors without affecting the batter?
Use gel food coloring instead of liquid. Gel colors are highly concentrated and won’t thin out your batter or frosting. This ensures your Ombre Rosette Cake layers stay light and fluffy while showing off vivid hues.
What if I don’t have a piping bag?
If you don’t have a piping bag, you can use a large zip-top bag with the corner snipped off. For the signature rosette swirl on an Ombre Rosette Cake, you’ll still want to use a large star piping tip if possible.
Can I use cream cheese frosting instead of buttercream?
While traditional buttercream holds rosettes better, you can use a stiff cream cheese frosting for your Ombre Rosette Cake if you prefer. Just make sure it’s thick enough to pipe and hold its shape.
How do I fix frosting mistakes?
If you make a mistake piping a rosette, gently lift it off with a small spatula and pipe again. Practicing a few rosettes on parchment paper beforehand can help you feel more confident.
Do I need a cake turntable?
A turntable makes frosting an Ombre Rosette Cake much easier, but it’s not absolutely necessary. You can rotate your cake on a flat plate or cake stand as you work.
How long will an Ombre Rosette Cake last?
Stored properly in an airtight container, an Ombre Rosette Cake will stay fresh for up to 2 days at room temperature or up to 5 days in the refrigerator. Bring it to room temperature before serving for the best taste.
These FAQs cover the basics, but remember — practice makes perfect! The more Ombre Rosette Cakes you bake, the easier and more fun the process will become.
Conclusion
Creating an Ombre Rosette Cake is more than just baking; it’s an opportunity to showcase your creativity and share something truly special with the people you care about. With its elegant gradient of colors and beautiful buttercream rosettes, this cake turns any gathering into a memorable occasion.
From gathering your ingredients and tools to leveling, stacking, and piping, every step you take builds your confidence and skills. By following this guide, you’ll learn how to avoid common mistakes, discover useful tricks, and find inspiration for customizing your Ombre Rosette Cake to match any theme.
Most importantly, remember that your Ombre Rosette Cake doesn’t have to be perfect — it just needs to be made with care. Each swirl of frosting is unique, and that’s what makes your homemade creation even more special than a store-bought cake.
So, gather your gel colors, warm up your piping bag, and have fun bringing your Ombre Rosette Cake to life. Once you see your guests’ faces light up when you present this stunning centerpiece, you’ll know every minute of effort was worth it.
Here’s to baking, celebrating, and creating unforgettable moments, one beautiful Ombre Rosette Cake at a time!