Easy Peanut Butter Jelly Cheesecake Recipe
There are few food pairings more iconic and beloved in American kitchens than peanut butter and jelly. This classic duo has graced lunchboxes, comforted generations, and satisfied countless sweet cravings. But what happens when you take the nostalgic charm of a peanut butter and jelly sandwich and elevate it to an elegant, indulgent dessert? The answer is simple: Peanut Butter Jelly Cheesecake. This innovative treat blends rich, creamy cheesecake with the familiar flavors of peanut butter and fruity jelly for a dessert that’s both comforting and refined.
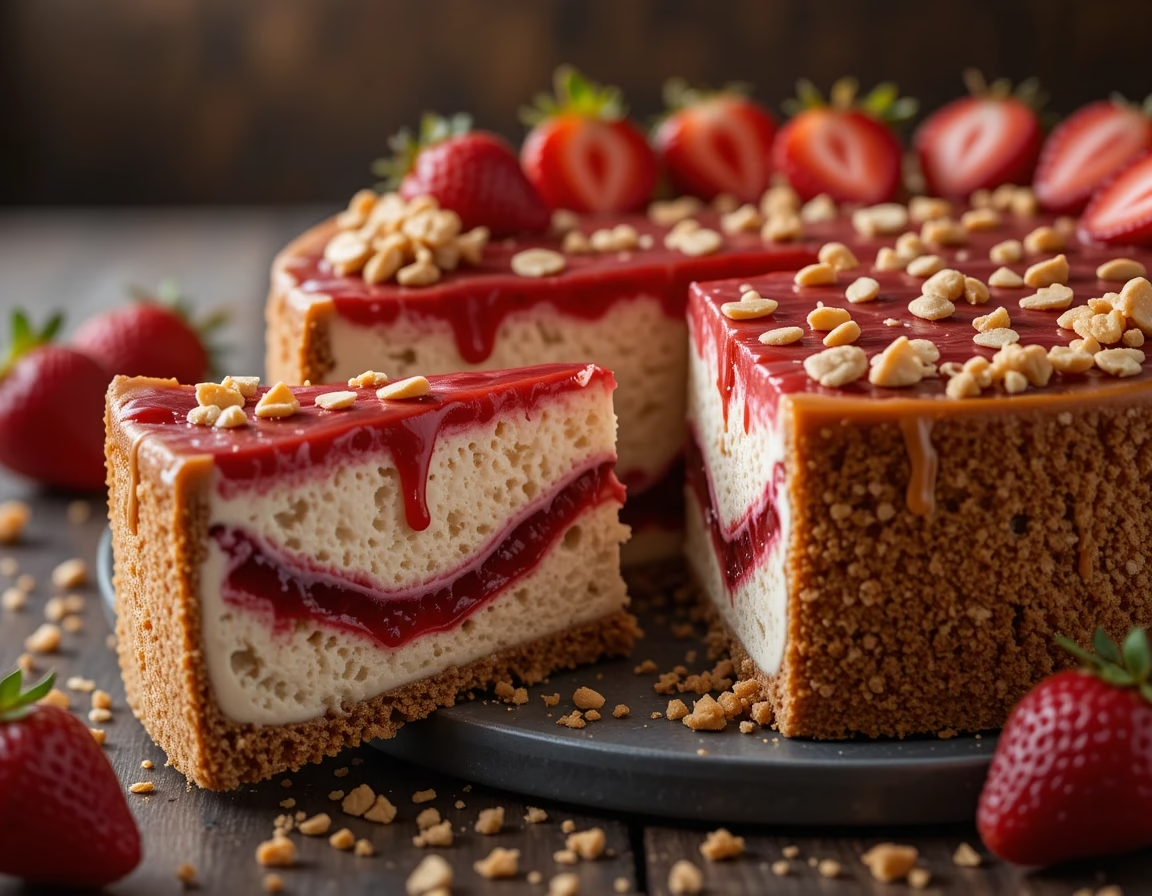
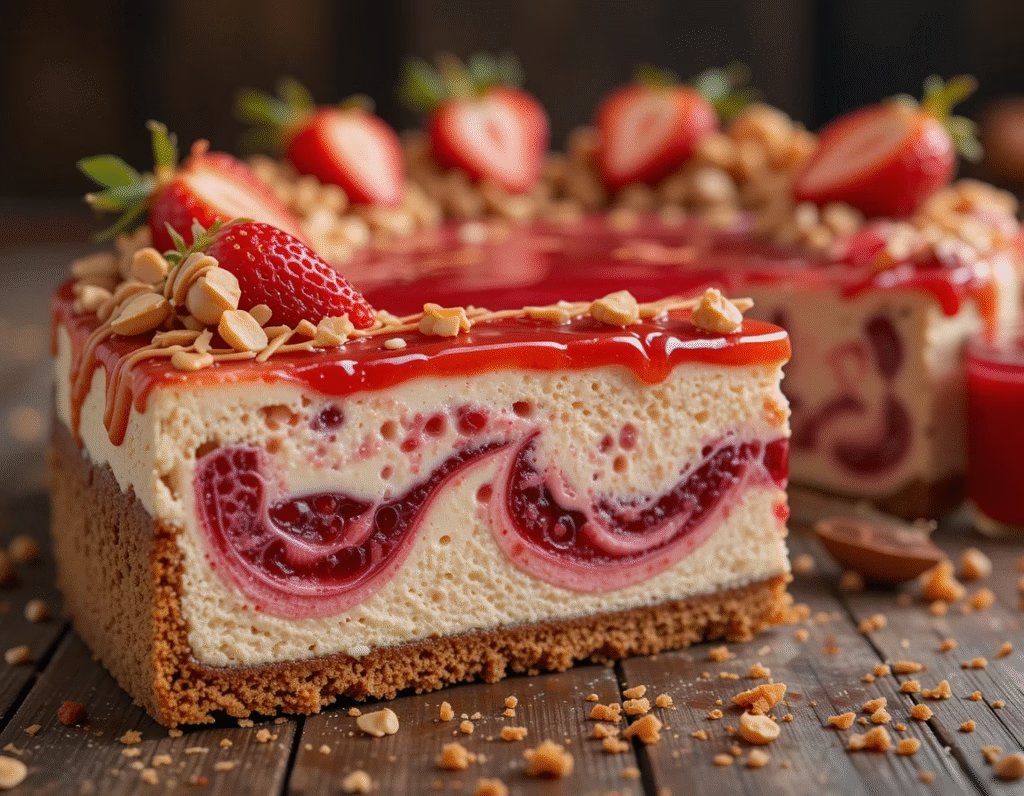
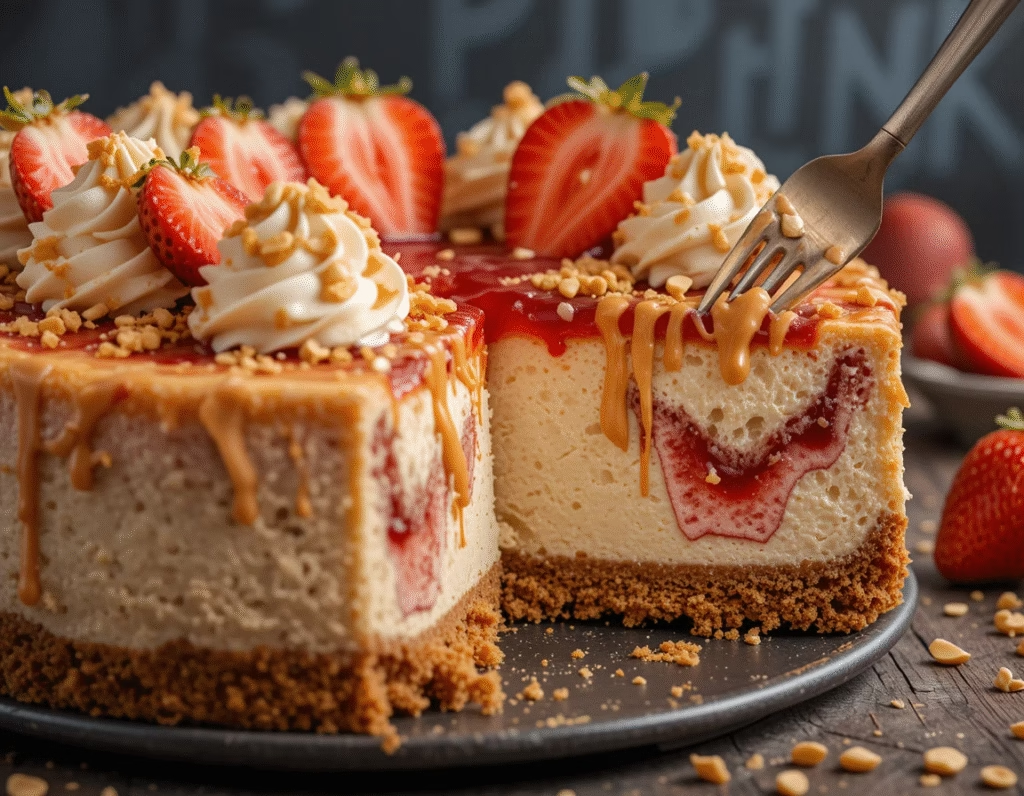
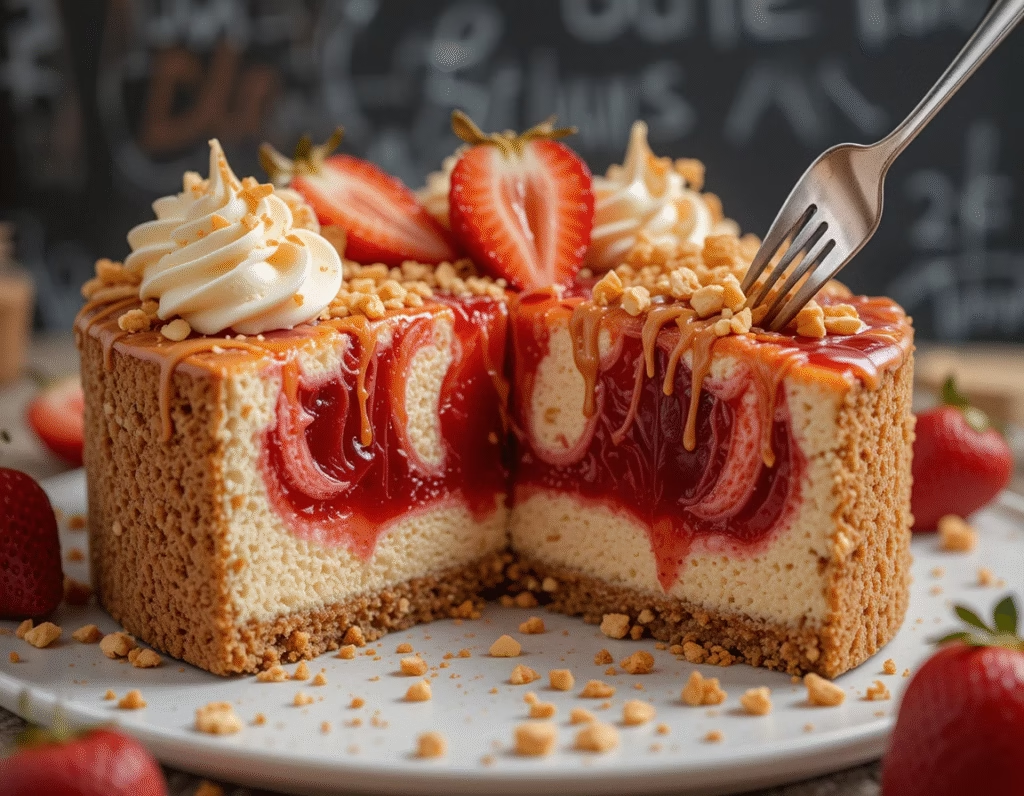
Peanut Butter Jelly Cheesecake is a crowd-pleaser in every sense. It’s nostalgic yet gourmet, playful yet polished. Whether you’re planning a birthday party, a weekend get-together, or simply treating yourself, this cheesecake promises to impress. With its creamy peanut butter filling, luscious jelly swirls or topping, and crunchy crust—this dessert captures the heart of childhood while satisfying a grown-up’s palate. Plus, it’s easy to customize with your favorite jelly flavor, whether you lean toward strawberry, grape, raspberry, or even blueberry.
What makes Peanut Butter Jelly Cheesecake truly special is its balance. The rich peanut butter flavor adds a deep, nutty warmth, while the jelly adds a pop of sweetness and fruitiness that lifts the entire dessert. The cheesecake base provides the perfect canvas for this dynamic pairing, creating a harmony of texture and taste in every bite. This isn’t just a cheesecake with toppings—this is a carefully crafted dessert where every layer plays a meaningful role.
In the realm of cheesecakes, Peanut Butter Jelly Cheesecake stands out for its creative flair and familiar comfort. It offers a fresh spin on tradition while paying homage to the simplicity and joy of childhood flavors. Whether you’re a seasoned baker or trying your hand at cheesecake for the first time, this recipe is approachable, rewarding, and absolutely delicious.
By the end of this blog, you’ll not only know how to make your own Peanut Butter Jelly Cheesecake, but you’ll also discover tips for perfecting the process, avoiding common pitfalls, and serving it like a pro. Prepare to fall in love with the magic of peanut butter and jelly all over again—this time in cheesecake form.
What You’ll Need
Creating the perfect Peanut Butter Jelly Cheesecake starts with selecting the right ingredients. This recipe isn’t overly complicated, but every component contributes to the final result, from the crust’s texture to the filling’s richness and the topping’s fruity brightness. Below is a breakdown of everything you’ll need to bring this nostalgic delight to life, along with tips on substitutions and quality choices.
For the Crust:
- 1 ¾ cups graham cracker crumbs (about 14 full sheets)
- ⅓ cup granulated sugar
- ½ cup unsalted butter, melted
The crust sets the stage for your Peanut Butter Jelly Cheesecake, offering a buttery, slightly crunchy contrast to the creamy filling. Graham crackers work perfectly, but if you’re feeling adventurous, you can also use crushed Nilla wafers or peanut butter cookies for an extra punch of nutty flavor.
For the Filling:
- 24 oz (3 packages) cream cheese, softened
- 1 cup creamy peanut butter (natural peanut butter is not recommended as it can separate)
- 1 cup granulated sugar
- ¾ cup sour cream (adds tang and creaminess)
- 1 tsp vanilla extract
- 3 large eggs
The filling is where Peanut Butter Jelly Cheesecake truly shines. Cream cheese provides the luxurious texture you expect in a cheesecake, while peanut butter adds richness and depth. Be sure all your ingredients are at room temperature before mixing to ensure a smooth, lump-free batter.
For the Jelly Swirl or Topping:
- ¾ cup fruit jelly or preserves (strawberry, grape, or raspberry are top choices)
- 1 tsp lemon juice (to brighten the jelly’s flavor, optional)
You can either swirl the jelly into the cheesecake batter for a marbled look or layer it on top after baking and chilling for a glossy finish. Choose a high-quality jelly for the best results—homemade or store-bought, just make sure it’s smooth and flavorful.
For Garnish (Optional but Recommended):
- Whipped cream
- Crushed peanuts or peanut butter chips
- Extra dollops of jelly or a peanut butter drizzle
Garnishes not only enhance the appearance of your Peanut Butter Jelly Cheesecake but also give guests a preview of the flavors they’re about to enjoy. A touch of crushed nuts or extra jelly can take the presentation to the next level.
By preparing each element with care and choosing quality ingredients, you set yourself up for cheesecake success. In the next section, we’ll walk step-by-step through how to assemble and bake your Peanut Butter Jelly Cheesecake, ensuring every bite is as dreamy as the last.
How to Make (Include Full Measurements)
Making a Peanut Butter Jelly Cheesecake might sound like an elaborate project, but it’s actually quite manageable, even for beginners. The key lies in following each step carefully and allowing adequate time for baking and chilling. The result is a velvety, creamy cheesecake that fuses peanut butter richness with jelly sweetness in every forkful. Below is your step-by-step guide to creating this show-stopping dessert from scratch.
Ingredients Recap:
For the Crust:
- 1 ¾ cups graham cracker crumbs (about 14 full sheets)
- ⅓ cup granulated sugar
- ½ cup unsalted butter, melted
For the Filling:
- 24 oz (3 blocks) cream cheese, softened
- 1 cup creamy peanut butter (avoid natural-style)
- 1 cup granulated sugar
- ¾ cup sour cream
- 1 tsp vanilla extract
- 3 large eggs, room temperature
For the Jelly:
- ¾ cup fruit jelly or preserves (strawberry, raspberry, or grape)
- 1 tsp lemon juice (optional, to brighten flavor)
Garnishes (Optional):
- Whipped cream
- Crushed peanuts
- Peanut butter drizzle or extra jelly
Instructions:
Step 1: Prepare the Crust
Preheat your oven to 325°F (163°C). In a mixing bowl, stir together graham cracker crumbs and sugar. Add the melted butter and mix until fully combined. Press the mixture into the bottom of a 9-inch springform pan, using a flat-bottomed glass or measuring cup to pack it tightly and evenly. Bake the crust for 10 minutes, then remove from oven and let it cool while you prepare the filling.
Step 2: Make the Peanut Butter Filling
In a large mixing bowl, beat the softened cream cheese until smooth and creamy—about 2 to 3 minutes using an electric mixer on medium speed. Add in the peanut butter and sugar, and continue to beat until well incorporated. Next, blend in the sour cream and vanilla extract until the mixture is silky.
Reduce the mixer speed to low, then add the eggs one at a time, mixing just until each is incorporated. Overmixing can lead to cracks, so aim for smooth but minimal mixing at this stage.
Step 3: Assemble and Swirl
Pour half of the peanut butter cheesecake batter over the pre-baked crust. Dot with a few spoonfuls of jelly, then swirl lightly with a toothpick or butter knife. Add the remaining batter and repeat the jelly swirl on top, or reserve the jelly for topping after baking.
Step 4: Bake with Care
Place the springform pan into a larger baking dish and add hot water around it to create a water bath. This helps the Peanut Butter Jelly Cheesecake bake evenly and prevents cracks.
Bake for 55–65 minutes or until the center is set but slightly jiggly. Once done, turn off the oven, crack the door, and let the cheesecake rest inside for an hour. Then remove from the oven, cool to room temperature, and refrigerate for at least 6 hours or overnight.
Step 5: Add Jelly Topping (Optional)
If you didn’t swirl jelly into the batter, you can now warm the jelly with a splash of lemon juice and spread it gently on top. This glossy finish not only adds flavor but makes your Peanut Butter Jelly Cheesecake look stunning.
Step 6: Garnish and Serve
Top with whipped cream, crushed peanuts, extra jelly, or a peanut butter drizzle for a final flourish. Your Peanut Butter Jelly Cheesecake is now ready to impress!
This recipe pairs beautifully with our Irresistible No-Bake Cherry Cheesecake Bars.
Serving and Storage Tips
Once you’ve baked your decadent Peanut Butter Jelly Cheesecake, it’s time to think about how to serve and store it to preserve all that creamy, flavorful goodness. While the preparation and baking are key, how you handle the cheesecake after it’s made can make just as much of a difference in the overall experience. A few simple tricks and techniques can ensure that each slice of Peanut Butter Jelly Cheesecake is as flawless as the first.
Serving Tips:
Slice with Precision
A clean slice of Peanut Butter Jelly Cheesecake is part of the presentation. For perfect pieces, use a long, thin knife dipped in hot water and wiped clean between each cut. This helps create smooth edges and prevents smearing the jelly or peanut butter layers.
Let It Sit Before Slicing
Although Peanut Butter Jelly Cheesecake needs to be refrigerated for proper setting, allow it to sit at room temperature for about 15 minutes before slicing. This softens the cheesecake slightly and enhances its creamy texture, making for a better mouthfeel.
Perfect for Presentation
Consider adding garnishes just before serving. A dollop of whipped cream, a few crushed peanuts, and an extra swirl of jelly will make your Peanut Butter Jelly Cheesecake pop visually and enhance its flavor. If you’re serving at a party or potluck, you can pre-slice the cheesecake and serve it in mini cupcake liners for mess-free elegance.
Pair It Well
Serve with coffee, milk, or even a fruit spritzer. The richness of the peanut butter and the tang of the jelly are beautifully balanced by a cold, light beverage. Avoid anything too acidic, as it might clash with the smooth profile of the cheesecake.
Storage Tips:
Refrigeration
Always store Peanut Butter Jelly Cheesecake in the refrigerator. Keep it covered with plastic wrap or in an airtight container to maintain freshness and prevent it from absorbing other fridge odors. It can last up to 5 days this way, retaining both texture and taste.
Freezing for the Future
Want to save some for later? Peanut Butter Jelly Cheesecake freezes beautifully. First, allow it to cool completely and chill in the fridge. Then wrap it tightly in plastic wrap and a layer of foil. You can freeze the whole cheesecake or individual slices. It stays good in the freezer for up to 2 months. Thaw overnight in the refrigerator before serving.
Avoid Room Temp Storage
Due to the dairy content, never leave Peanut Butter Jelly Cheesecake at room temperature for more than 2 hours. After that, the texture may degrade and it becomes unsafe to consume. Always return any uneaten portions to the fridge quickly.
With proper serving and storage, your Peanut Butter Jelly Cheesecake can remain a star dessert for days after it’s made. In the next section, we’ll cover common mistakes to avoid when preparing this treat so you can enjoy picture-perfect results every time.
Mistakes to Avoid
Baking a Peanut Butter Jelly Cheesecake is a delightful adventure, but like any dessert, there are a few common pitfalls that can impact the final outcome. Knowing these mistakes ahead of time helps ensure your cheesecake turns out creamy, smooth, and perfectly balanced between peanut butter and jelly flavors. Let’s walk through the key mistakes to avoid when making your Peanut Butter Jelly Cheesecake so you can bake with confidence.
Using Cold Ingredients
One of the most common mistakes is not allowing your cream cheese, eggs, and sour cream to reach room temperature before mixing. Cold ingredients can cause lumps in the batter and prevent a smooth, creamy texture. For the best Peanut Butter Jelly Cheesecake, plan ahead and leave these ingredients out for at least 30 to 60 minutes before starting.
Overmixing the Batter
Overmixing is another frequent issue. While it’s important to combine ingredients well, beating the batter excessively can introduce too much air, causing cracks or a dense texture after baking. When adding eggs, mix just until combined to maintain the cheesecake’s silky consistency.
Skipping the Water Bath
Baking the cheesecake without a water bath is a mistake that can lead to cracks and uneven cooking. The water bath provides a gentle, moist heat that helps the Peanut Butter Jelly Cheesecake bake evenly and prevents the surface from drying out. Be sure to wrap the bottom of your springform pan with foil to avoid leaks and place it in a larger pan with hot water.
Using Natural Peanut Butter
Natural peanut butter tends to separate into oil and solids, which can affect the texture and consistency of your cheesecake filling. For the best results in your Peanut Butter Jelly Cheesecake, use smooth, creamy peanut butter that is well emulsified.
Adding Jelly Too Early or Too Much
Adding jelly too early or swirling it aggressively can cause it to sink or blend completely into the batter, losing its distinct flavor and appearance. Swirl jelly gently and only add it right before baking or as a topping after chilling to maintain that beautiful contrast in your Peanut Butter Jelly Cheesecake.
Not Chilling Long Enough
Cheesecakes need sufficient time to chill and set properly. Cutting into your Peanut Butter Jelly Cheesecake too soon can result in a runny or crumbly texture. Ideally, refrigerate for at least 6 hours or overnight to allow flavors to meld and the texture to firm up.
Ignoring Crust Preparation
Failing to press the crust firmly into the pan or skipping the pre-bake step can cause the crust to crumble or become soggy once the filling is added. Taking the time to properly prepare and bake the crust ensures a stable base that complements your Peanut Butter Jelly Cheesecake perfectly.
Avoiding these mistakes will elevate your baking experience and ensure your Peanut Butter Jelly Cheesecake is as luscious and visually stunning as you imagine.
Tips and Tricks
Mastering the art of making Peanut Butter Jelly Cheesecake means embracing a few handy tips and tricks that make the process easier and the result more delicious. Whether you’re a beginner or an experienced baker, these insights will help you bring out the best in every slice of this decadent dessert.
Choose Quality Ingredients
The flavor of your Peanut Butter Jelly Cheesecake depends heavily on the quality of your ingredients. Use high-quality cream cheese, smooth peanut butter, and premium fruit jelly. Fresh eggs and pure vanilla extract also make a noticeable difference.
Room Temperature is Key
Before mixing, allow all dairy ingredients and eggs to come to room temperature. This helps prevent lumps and ensures a smooth, creamy filling that bakes evenly.
Gentle Jelly Swirling
When incorporating the jelly, use a butter knife or toothpick to gently swirl it into the batter. This technique creates beautiful marbled patterns and keeps the flavors distinct without overmixing.
Use a Springform Pan
A 9-inch springform pan is ideal for cheesecakes. It makes removing the delicate dessert much easier without damaging its shape. Also, line the pan’s bottom with parchment paper for extra security.
Water Bath for Baking
Wrap the springform pan’s bottom with aluminum foil and bake it in a water bath. This moist heat method prevents cracking and ensures the Peanut Butter Jelly Cheesecake cooks evenly.
Chill Thoroughly
Patience pays off. Allow your cheesecake to chill in the refrigerator overnight if possible. This resting time develops the flavors and firms up the texture, making slicing easier and enhancing the taste.
Garnish Creatively
Don’t be afraid to get creative with your garnishes! Consider chopped peanuts, mini peanut butter cups, or fresh berries on top. A drizzle of melted peanut butter or a few jelly dollops can elevate presentation and flavor.
Cut Clean Slices
For neat slices, dip your knife in hot water and wipe it clean before each cut. This tip prevents smudging and creates smooth, beautiful pieces perfect for serving.
Experiment with Jelly Flavors
While strawberry and grape are classic, feel free to try other jellies like raspberry, blueberry, or even apricot. Different jellies can offer unique flavor twists to your Peanut Butter Jelly Cheesecake.
Suggestions
Creating a Peanut Butter Jelly Cheesecake opens up a world of delicious possibilities, and there are plenty of ways to customize this dessert to suit your tastes or the occasion. Whether you want to elevate the classic combo or make it a showstopper for special events, these suggestions will inspire you to take your Peanut Butter Jelly Cheesecake to the next level.
Flavor Variations
While the traditional Peanut Butter Jelly Cheesecake pairs creamy peanut butter with sweet strawberry or grape jelly, don’t hesitate to experiment with different flavors. Try raspberry jelly for a slightly tart contrast, or even apricot preserves for a subtle sweetness that pairs beautifully with peanut butter. You can also add a touch of cinnamon or nutmeg to the batter for a warm spice twist.
Texture Enhancements
For extra crunch, mix in chopped peanuts or peanut brittle into the crust or sprinkle them on top as a garnish. Adding mini chocolate chips or swirls of melted chocolate can create a delightful surprise inside your Peanut Butter Jelly Cheesecake slices.
Presentation Ideas
For parties or special gatherings, serve your Peanut Butter Jelly Cheesecake in individual portions using mini springform pans or mason jars. Layer the crust, filling, and jelly separately for a visually stunning dessert. You can also pipe whipped cream around the edges and garnish with fresh berries for a refined finish.
Alternative Crusts
If you’re looking for a gluten-free option or simply want to change up the base, consider using crushed gluten-free cookies or even a nut-based crust made from finely ground almonds or pecans mixed with butter and sugar. This adds a unique flavor and texture that complements the peanut butter and jelly layers.
Dairy-Free and Vegan Options
To make a dairy-free Peanut Butter Jelly Cheesecake, substitute cream cheese with vegan cream cheese alternatives and use coconut cream instead of sour cream. Use a flax egg (1 tablespoon ground flaxseed mixed with 3 tablespoons water) in place of real eggs. Choose jelly brands that don’t use gelatin for a completely vegan-friendly dessert.
Pairing with Drinks
Serve your Peanut Butter Jelly Cheesecake alongside a cold glass of milk, a creamy latte, or even a fruity iced tea. These beverages complement the richness of the peanut butter and balance the sweetness of the jelly.
With these suggestions, your Peanut Butter Jelly Cheesecake can be tailored perfectly to your preferences or event, ensuring it’s always a crowd-pleaser.
FAQ
Making a Peanut Butter Jelly Cheesecake raises many questions for first-timers and even experienced bakers. To help you navigate this delicious recipe with ease, here are some frequently asked questions with clear, helpful answers.
Can I use natural peanut butter in the recipe?
It’s best to use smooth, creamy peanut butter that is well emulsified for a consistent texture. Natural peanut butter tends to separate oil and solids, which can affect the cheesecake’s texture.
What type of jelly works best?
Classic strawberry or grape jelly are popular, but raspberry, blueberry, or apricot preserves can also add interesting flavor twists to your Peanut Butter Jelly Cheesecake.
How long does the cheesecake need to chill?
For the best texture and flavor, chill the cheesecake for at least 6 hours, preferably overnight. This allows the cheesecake to set fully and makes slicing easier.
Can I freeze the cheesecake?
Yes! Wrap your Peanut Butter Jelly Cheesecake tightly in plastic wrap and foil, and freeze for up to 2 months. Thaw in the refrigerator overnight before serving.
How do I prevent cracks on my cheesecake?
Bake the cheesecake in a water bath to ensure gentle, even cooking. Avoid overmixing the batter and let the cheesecake cool gradually with the oven door cracked open after baking.
Can I make this cheesecake gluten-free?
Yes, substitute the graham cracker crust with gluten-free cookies or a nut-based crust to make it gluten-free without sacrificing flavor.
What if I don’t have a springform pan?
A springform pan is highly recommended because it allows easy removal without damaging the cheesecake. However, you can use a regular cake pan lined with parchment paper and carefully loosen the edges before removing.
Can I prepare the cheesecake ahead of time?
Absolutely! Peanut Butter Jelly Cheesecake actually tastes better the next day after flavors have melded. Prepare it a day in advance for best results.
Conclusion
The journey of making a Peanut Butter Jelly Cheesecake is as rewarding as the delicious dessert itself. This unique fusion of creamy peanut butter, sweet jelly, and rich cheesecake offers an irresistible combination that delights both nostalgic and adventurous palates. Throughout this blog, we’ve explored every aspect to help you master the art of creating a flawless Peanut Butter Jelly Cheesecake, from selecting the right ingredients to avoiding common mistakes and adding your personal twist.
Whether you’re baking this dessert for a casual family gathering or a special celebration, the Peanut Butter Jelly Cheesecake is sure to impress with its luscious texture, balanced flavors, and eye-catching layers. The versatility of this cheesecake allows endless customization — from swapping jelly flavors to experimenting with crusts and toppings — making it a creative canvas for your baking skills.
Remember, patience is key. Let your cheesecake chill properly to achieve the perfect slice, and don’t hesitate to use the tips and tricks shared here to elevate your baking game. The joy of slicing through that creamy, rich peanut butter layer intertwined with vibrant jelly swirls is truly unmatched.
We hope this guide inspires you to bake and share this delightful dessert often. The Peanut Butter Jelly Cheesecake is not only a delicious treat but also a wonderful way to create lasting memories with loved ones. Happy baking and savor every bite of your homemade masterpiece!